Open topic with navigation
Command: Transition Rate (56)
See the Commands
Overview topic for basic command information and how to issue commands
from PLCs, HMIs, etc.
Command Parameters
|
#
|
Parameter Description
|
Range
|
|
1
|
Max Speed (pu/s)
|
Any REAL number.
|
|
2
|
Accel Rate (pu/s2)
|
Any REAL number.
|
|
3
|
Transition Type
-
Seek (0)
-
Reach (1)
-
Superimposed (2)
|
A valid integer as described.
|
|
4
|
Direction
-
Negative* (-1)
-
Nearest (0)
-
Positive* (1)
-
Current* (2)
-
Absolute* (3)
* These options are intended for use with rotary axes. However, all options are available on linear axes, but have no effect. See the Rotary Axes section below.
|
a valid integer as described
|
Description
This command enables position axis transitions
and defines the speed and acceleration of the transition. This command
does not start any motion. Rather, it will apply when certain motion commands
are issued to the axis. If you need transitions on a pressure/force axis,
see the Transition
Rate (Prs/Frc) (64) command.
Transitions are useful for starting certain
types of motion even though the axis is not at the correct starting point.
For example, the Sine Start
(72), Trapezoid Start (130), Curve Start
(86), Curve
Start Advanced (88) and Gear
Absolute (25) commands normally require that the axis be at the correct
starting point. However, if a transition has been enabled, then these
commands can be issued even though the axis is not at the correct starting
point. When the motion command is issued, the axis will move toward the
requested profile (curve, sine wave, trapezoid waveform, gearing relationship, etc.) as defined
by the transition command.
When the RMC powers up, transitions are disabled
on all axes. To enable position axis transitions, issue the Transition
Rate (56) command. Once this command has been issued, it does not need
to be issued again, unless you wish to specify a different transition,
or if you need to re-enable transitions after disabling transitions. To
disable position transitions, issue the Transition
Disable (55) command.
This command will not affect any transitions
that are in progress.
Transition Types
This command provides the following transition
options:
-
Seek (0)
The axis will move toward the requested profile using the Max Speed and Accel Rate. When the position and velocity of the axis come close to the position and velocity of the profile, the axis will "lock" onto the profile. Use this option to get to the requested profile quickly and smoothly.
-
Reach (1)
The axis will move toward the requested profile using the Max Speed and Accel Rate. When the position reaches the position of the profile, the axis will "lock" onto the profile. Notice that this option does not require that the velocities be close when it locks on, and therefore may cause the axis to jerk. Use this option to get to the requested profile as quickly as possible.
-
Superimposed (2)
A move using the Max Speed and Accel Rate will be superimposed onto the requested profile such that the axis will reach the profile. Notice that since the move is superimposed onto the profile, the axis will not necessarily move at the specified speed and acceleration, but rather at the sum of the speeds and accelerations from the requested profile and the superimposed portions of the move.
This method will
always guarantee that the axis will lock on to the requested profile,
even if the Max Speed and Accel Rate are slower than that
of the profile. The time it takes to lock on will be based on how far
the axis position is from the requested profile and on the Max
Speed. For example, if the axis is at 3, the profile is at 9, and
the Max Speed is 6, it will take roughly one second to lock on. The "lock-on"
of the Superimposed method will be as smooth or smoother than Seek.
The superimposed move will use the target type that is defined for the axis, which can be either a trapezoidal or s-curve velocity. For the RMC200, this is defined by the Target Type axis parameter. The for the RMC75 and RMC150, this is defined by the Requested Jerk axis parameter.
Choosing a Transition Type
To choose a transition type:
-
Use Seek when: the commanded motion profile is smooth and the profile is fairly well known.
-
Use Reach in any of these cases:
-
The commanded motion profile is variable, and it is unknown whether the Max Speed and Accel Rate will always be sufficient to lock on quicly.
-
The Seek method takes too long to lock on.
-
It is more important to lock on than to smoothly lock on.
-
Use Superimposed when:
-
If there is any question as to whether a lock on can be achieved with Seek or Reach.
-
The absolute speed at which the transition is made is not important (with Superimposed, the absolute speed is the combination of the commanded motion profile and Max Speed of the Transition command).
The behavior of any of theses methods will be very similar if the master is not moving while the transition is taking place. If the master is moving, and is a well-behaved Target Position, then the Seek and Reach methods will both behave very similarly. If the master is moving, but is noisy, such as an analog reference signal, then the Reach method will "lock in" the quickest, but may cause jerk.
Shown below is an example of how the various
options work for one sample profile. Notice that the behavior will vary
for other profiles.
|
Seek
|
Reach
|
Superimposed
|
|
The Seek method waits until the position and velocity are close before locking in. If the master was not accelerating or decelerating, it would lock in quicker.
|
The Reach method locks in as soon as the position reaches the master. This can cause a jerk in the Target Position of the slave axis.
|
The gray line shows the move that is superimposed onto the master, and results in the slave target.
|
Max Speed and Accel Rate
Important! For the Seek and Reach transition types, make sure the Max Speed and Accel Rate are set to values higher than that of the profile it is trying to follow. Otherwise, the axis may never catch up to the profile.
It may not be obvious from the motion that the axis has not locked on because the axis will be continuously moving, sometimes in a similar profile.
For example, consider the plot below where:
-
Transition type is Seek
-
The Max Speed and Accel Rate are too low
-
Blue: desired commanded sine wave
-
Red: the actual motion with transition
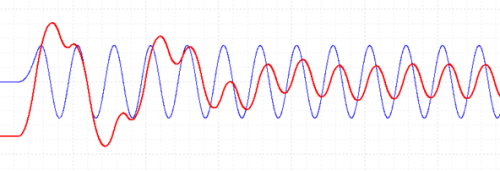
The actual Red motion eventually looks like a sine wave, but it is still trying to catch up to the commanded Blue sine wave, so it is not the commanded sine wave. In this case, the transition would have locked on much earlier with the Reach type, but it would have caused a jerk. The Superimposed method would have also locked on very quickly, with a very smooth lock-on.
In these situations, the Target Generator Superimposed Busy (TGSIBusy) axis status bit will be on, confirming that the axis is still in the transition and has not locked on to the commanded motion.
Rotary Axes
Transitions fully support rotary axes. The Direction
options listed below define the direction in which the axis should move
to reach the desired starting position. The starting position is determined
at the time a motion command requiring the transition is issued.
For the Negative, Nearest, Positive, and Current
options, if the starting position value is outside the valid range of
the rotary axis, the starting position will be set within the valid range
using modulo arithmetic such that the position will be the same location
within the range.
-
Negative (-1)
The axis will move in the negative direction to reach the starting position.
-
Nearest (0)
The axis will move in the direction which in which the starting position is nearest to the current Target Position.
-
Positive (1)
The axis will move in the positive direction to reach the starting position.
-
Current (2)
The axis will move in the direction of the current Target Velocity to reach the starting position. If the current Target Velocity is zero, it will behave as the Nearest option.
-
Absolute (3)
The starting position is treated as a position on a linear axis; the axis begins moving toward the starting position as if on a linear scale. If the position is outside of the valid position range, the axis rotates through the number of revolutions required to reach the position. Each time the Target Position wraps during the move, the Position Unwind value is subtracted from the Command Position until the Command Position is within the valid position range.
For more details and examples, see the Rotary
Motion topic.
Status Bits
Pri. TG SI Busy (Primary Target Generator Superimposed
Busy) Bit
This bit will be set when the transition begins.
Notice that this is when the motion command is issued, not necessarily
when the Transition rate command is issued. When the transition actually
takes place, this bit will be set until the axis "locks on".
See Also
Transition
Disable (55) | Curve
Start (Prs/Frc) (87) | Sine
Start (Prs/Frc) (76) | Gear
Absolute (25)| Trapezoid Start (130)
Send comments on this topic.
Copyright © 2026 Delta Computer Systems, Inc. dba Delta Motion