How to: Use from Visual C# |
Visual C# users should use the RMCLink.Interop .NET Assembly instead of using the RMCLink COM Component directly. Specifics on using this component from Visual C# are described below, including a step-by-step walkthrough. The project developed in the walk-through is included as a Visual C# project in the RMCLink example projects.
Before referencing types in the RMCLinkNET namespace, you must add a reference to the RMCLink.Interop .NET assembly.
To add a reference to the RMCLink.Interop .NET assembly:
Open or create a new project in Visual C#.
On the Project menu, click Add Reference. The Add References dialog box is different between Visual C# versions.
Select the Browse tab.
Browse to the RMCLink.Interop.dll file. It is located in your RMCLink install folder, which is C:\Program Files\RMCLink by default.
Click OK.
The RMCLink.Interop assembly appears in your project's References folder.
In Visual C# 2010 or later, do the following to ensure that RMCLink is properly linked:
In your project's References folder, select the RMCLink.Interop item.
If the Properties window is not visible, then on the View menu, point to Other Windows, and then click Properties Window, or press ALT+ENTER. For Visual Studio 2022, click Properties Window directly from the View menu or press F4.
In the Properties window, for the RMCLink.Interop reference properties, set Embed Interop Types to False.
In the Properties window, for the RMCLink.Interop reference properties, set Copy Local to True.
You can now browse the RMCLinkNET namespace using the Object Browser:
On the View menu, click Object Browser.
You should see the RMCLink.Interop assembly and be able to browse all the types included in it.
Close the Object Browser when you are done.
All types in the RMCLink.Interop assembly are contained within the namespace RMCLinkNET. When any .NET type is referenced in the program, the compiler must know which namespace(s) to look in. Notice that adding a reference to the assembly does not make the compiler look in its namespace by default. In C#, use one of the following to specify the namespace.
First, you can qualify each type located in the RMCLinkNET namespace by prefixing them with the RMCLinkNET. as shown below.
RMCLinkNET.RMCLink rmc = RMCLinkNET.RMCLink.CreateEthernetLink(RMCLinkNET.DeviceType.RMC70, "192.168.0.10");
However, most .NET programmers prefer the using statement, as shown below.
using RMCLinkNET;
...
RMCLink rmc = RMCLink.CreateEthernetLink(DeviceType.RMC70, "192.168.0.10");
The using statement tells the compiler to always check the given namespace when resolving a type, and eliminates the need to specify the namespace on every type reference.
The first step is to create an instance of the RMCLink class. Use one of the static CreateEthernetLink, CreateSerialLink or CreateUSBLink methods to create the instance; because there is no public constructor, the new keyword cannot be used. The following line demonstrates how this is done in Visual C#:
using RMCLinkNET;
...
RMCLink rmc = RMCLink.CreateEthernetLink(DeviceType.RMC70, "192.168.0.10");
Notice that this line will only compile correctly if the reference to the RMCLink.Interop assembly has been added to the project as described above.
Notice that although most Visual C# samples in this documentation control the entire lifetime of the RMCLink object within a single function, this is often not the most efficient way of using the RMCLink control. Generally, when you first want to connect to a controller, you will create the RMCLink object and call its Connect method. This RMCLink object should be located outside of the function or subroutine that creates and connects it, so that it can be used by other functions and subroutines to read or write from it.
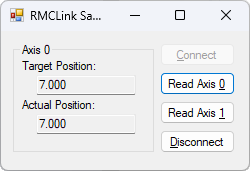
This walkthrough will create a simple application in Visual C# for reading the Target and Actual Positions from either axis 0 or axis 1 of an RMC70. The project developed in this walk-through is included as a Visual C# project in the RMCLink example projects.
The final application will look like this:
Open the Visual C# IDE.
On the File menu, point to New, and then click Project. This will open the New Project dialog box.
For Visual C# 2008 or later, locate and select the Visual C# template named Windows Forms Application. For Visual C# 2005, locate and select the Visual C# template named Windows Application.
In the Name text box, type "RMCLinkSample".
In the Location text box, type the path where you want to save this project.
Click OK.
Add controls to the MainForm using the Toolbox so that the form looks approximately like this, using the properties described below:
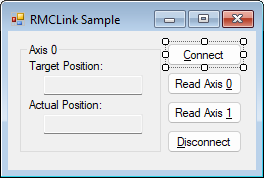
MainForm.cs [Design] - Visual C#
For the Form, use the default properties except for the following changes:
MainForm Form
|
Text |
RMCLink Sample |
For the controls in the first column, from top to bottom, use the default properties except for the following changes:
axisGroup GroupBox
|
(Name) |
axisGroup |
|
Text |
Axis 0 |
label1 Label
|
Text |
Target Position: |
tarPosValue TextBox
|
(Name) |
tarPosValue |
|
ReadOnly |
True |
|
TabStop |
False |
|
Text |
(blank) |
label2 Label
|
Text |
Actual Position: |
actPosValue TextBox
|
(Name) |
actPosValue |
|
ReadOnly |
True |
|
TabStop |
False |
|
Text |
(blank) |
For the controls in the second column, from top to bottom, use the default properties except for the following changes:
connectButton Button
|
(Name) |
connectButton |
|
Text |
&Connect |
|
TabIndex |
0 |
readAxis0Button Button
|
(Name) |
readAxis0Button |
|
Text |
Read Axis &0 |
|
TabIndex |
1 |
readAxis1Button Button
|
(Name) |
readAxis1Button |
|
Text |
Read Axis &1 |
|
TabIndex |
2 |
disconnectButton Button
|
(Name) |
disconnectButton |
|
Text |
&Disconnect |
|
TabIndex |
3 |
To test the application, on the Debug menu, click Start Without Debugging. The buttons do nothing yet.
Before using the RMCLink.Interop assembly, we must add a reference to the assembly:
On the Project menu, click Add Reference. The Add References dialog box is different between Visual C# versions.
Select the Browse tab.
Browse to the RMCLink.Interop.dll file. It is located in your RMCLink install folder, which is C:\Program Files\RMCLink by default.
Click OK.
The RMCLink.Interop assembly should appear in your project's References folder.
In Visual C# 2010 or later, do the following to ensure that RMCLink is properly linked:
In your project's References folder, select the RMCLink.Interop item.
If the Properties window is not visible, then on the View menu, point to Other Windows, and then click Properties Window, or press ALT+ENTER.
In the Properties window, for the RMCLink.Interop reference properties, set Embed Interop Types to False.
In the Properties window, for the RMCLink.Interop reference properties, set Copy Local to True.
We will first define a private field to hold the RMCLink object reference. This reference will be used by the various member methods that will be added later. Open the Code View of MainForm.cs (on the View menu, click Code), and add the following lines to the code:
|
Top of MainForm Module |
... using RMCLinkNET; namespace RMCLinkSample { public partial class MainForm : Form { ... private RMCLink rmc; } } |
The declaration of the rmc variable as an RMCLink object reference will be used by each of the handler functions added in later steps. The using statement instructs the compiler to automatically check the RMCLinkNET namespace when resolving type references in this file.
The previous step defined the rmc variable. However, we have not yet created an instance of it nor used it in any other way. We will now start creating event handlers that use this variable. Use the following instructions for creating each required handler.
To add an event handler to a Windows Forms object:
Switch to the Design View for MainForm.cs (on the View menu, click Designer).
Select the form object that you want to add an event handler to. This may be the form itself or a control in the form.
On the View menu, click Properties Window, or press Alt+Enter.
In the form/control properties window, select the Event (![]() ) button on the toolbar.
) button on the toolbar.
In the list of events for the form/control, type the name of the method that will handle the event.
In this step we will create two MainForm event handlers: one for Load and one for FormClosing.
Add the following handler for the Load event on the MainForm class.
|
Handler for MainForm Load Event |
...

    public partial class MainForm : Form
    {
        ...

        private void MainForm_Load(object sender, EventArgs e)
        {
            // Create an RMCLink object.
            rmc = RMCLink.CreateEthernetLink(DeviceType.RMC70, "192.168.0.22");

            // Since we are disconnected to start, enable the buttons accordingly.
            connectButton.Enabled = true;
            readAxis0Button.Enabled = false;
            readAxis1Button.Enabled = false;
            disconnectButton.Enabled = false;
        }
    }
...
|
This handler creates an instance of the RMCLink class. This way all other handlers in our form can count on this object existing. Notice that the last four lines of this subroutine simply enable the Connect button and disable the other buttons since they can't be used until the link has been connected.
Next, add the following handler for the FormClosing event on the MainForm class.
|
Handler for MainForm FormClosing Event |
...

    public partial class MainForm : Form
    {
        ...

        private void MainForm_FormClosing(object sender, FormClosingEventArgs e)
        {
            if ( rmc.IsConnected(PingType.DoNotPing) )
                rmc.Disconnect();
        }
    }
...
|
This handler makes sure that the RMCLink object is disconnected. This is not strictly necessary since when the application closed the RMCLink object is released, which will disconnect it from the controller, but it is good practice nonetheless. For example, if this was not the only form in the application, then we have no control over when the rmc object is actually garbage collected, and therefore the serial port or TCP/IP connection may be left open unnecessarily long.
Notice that we call the RMCLink.IsConnected method to avoid an exception being thrown by the RMCLink.Disconnect method if the connection was not currently open. It is generally better to catch this case with the above logic rather than an exception.
To test the application, on the Debug menu, clicking Start Without Debugging. The buttons still do nothing, but they should be properly enabled on startup.
Next, we will handle the user clicking the Connect and Disconnect buttons.
Add the following handler for the Click event on the connectButton control.
|
Handler for connectButton Click Event |
...

    public partial class MainForm : Form
    {
        ...

        private void connectButton_Click(object sender, EventArgs e)
        {
            try
            {
                rmc.Connect();

                // We have successfully connected, so update which buttons are enabled.
                readAxis0Button.Enabled = true;
                readAxis1Button.Enabled = true;
                disconnectButton.Enabled = true;
                connectButton.Enabled = false;
            }
            catch ( ConnectionNotMadeException ex )
            {
                MessageBox.Show("Unable to connect. " + ex.Message);
            }
        }
    }
...
|
When the Connect button is clicked, we make a call to RMCLink.Connect. However, since this method can fail if the controller cannot be connected to, we need to handle the error case. Therefore, we wrap the code in a try-catch block, catching specifically the ConnectionNotMadeException. Without catching this exception, the application would crash if the connection could not be established. Finally, if we successfully connect (that is, the exception is not thrown), we enable the buttons that required us to be connected and disable the Connect button.
Next, add the following handler for the Click event on the disconnectButton control.
|
Handler for disconnectButton Click Event |
...

    public partial class MainForm : Form
    {
        ...

        private void disconnectButton_Click(object sender, EventArgs e)
        {
            rmc.Disconnect();

            // We have successfully disconnected, so update which buttons are enabled.
            connectButton.Enabled = true;
            readAxis0Button.Enabled = false;
            readAxis1Button.Enabled = false;
            disconnectButton.Enabled = false;
        }
    }
...
|
When the Disconnect button is clicked, we make a call to RMCLink.Disconnect. This function will always succeed, provided we don't call it when the link is already disconnected, but we have covered that case by correctly enabling the command buttons. After disconnecting, we disable the buttons that require a connection to be established and re-enable the Connect button.
To test the application, on the Debug menu, clicking Start Without Debugging. The Connect and Disconnect buttons should now work, although the Read Axis 0 and Read Axis 1 buttons still do nothing.
The final step is to implement the handlers for the Read Axis 0 and Read Axis 1 buttons. Both functions do the same things, except that they set the axisGroup text differently, and they read from different status files. Both will call a common private method to do the majority of the work.
Add the following handlers for the Click events on the readAxis0Button and readAxis1Button controls, plus the private helper method.
|
Handler for readAxis0Button and readAxis1Button Click Events |
...

    public partial class MainForm : Form
    {
        ...

        private void readAxis0Button_Click(object sender, EventArgs e)
        {
            HandleReadAxisButton(0);
        }

        private void readAxis1Button_Click(object sender, EventArgs e)
        {
            HandleReadAxisButton(1);
        }

        private void HandleReadAxisButton(int axis)
        {
            try
            {
                float[] data = new float[2];

                // Read the Target Position (Fx:53) into data[0].
                rmc.ReadFFile((int)FileNumber70.fn70StatusAxis0 + axis, 53, data, 0, 1);

                // Read the Actual Position (Fx:8) into data[1].
                rmc.ReadFFile((int)FileNumber70.fn70StatusAxis0 + axis, 8, data, 1, 1);

                // Update the display.
                axisGroup.Text = "Axis " + axis.ToString();
                tarPosValue.Text = string.Format("{0:F3}", data[0]);
                actPosValue.Text = string.Format("{0:F3}", data[1]);
            }
            catch ( ReadWriteFailedException ex )
            {
                disconnectButton_Click(null, null);
                MessageBox.Show("Unable to read data. " + ex.Message);
            }
        }
    }
...
|
The HandleReadAxisButton method wraps the code handling in a try-catch block, catching specifically the ReadWriteFailedException. If this exception was not caught, then the application would crash if the cable was disconnected and a read was attempted. The exception handler displays an error message before, but it also calls the disconnectButton_Click handler. This is because a failed read or write does not disconnect the connection, and plus we want to return the button enabled states to being disconnected.
The rest of the body of these methods simply reads the values and updates the text boxes and axis label accordingly.
To test the completed application, on the Debug menu, clicking Start Without Debugging.
See Also
RMCLink.Interop .NET Assembly | How Do I Overview | RMCLink Component
Copyright (c) 2024 Delta Computer Systems, Inc. dba Delta Motion