How to: Use from Visual Basic 5.0/6.0 |
Note: Visual Basic 5.0/6.0 are very old technologies and are not recommended for new applications. You will have difficulty installing the development tools on modern versions of Windows. A future version of RMCLink will remove Visual Basic 5.0/6.0 content. Instead, consider Visual Basic (.NET).
Visual Basic 5.0 and 6.0 users should use the RMCLink COM Component interface. Specifics on using this component from Visual Basic are described below, including a step-by-step walkthrough. The project developed in the walk-through is included as a Visual Basic project in the RMCLink example projects.
Visual Basic can reference COM components using one of two methods: early binding or late binding. With early binding, the compiler knows how the COM component is defined and can use this information to make the use of the COM component more efficient and is able to catch more errors at compile time instead of runtime. Late binding is only intended for use by languages that cannot do early binding (such as VBScript or JScript) or to use components that do not make their type information available. However, since RMCLink makes its type information available, early binding should always be used with the RMCLink COM component from Visual Basic.
There are three things you must do to use early binding. First, you must add a reference to the COM components type library, which is described below. Second, you must declare your object variables of the proper types. Third, you should use the New keyword instead of the CreateObject function when creating an RMCLinkServer object. The following code demonstrates the last two points:
Dim srv As RMCLinkServer
Dim rmc As RMCLink
Set srv = New RMCLinkServer
Set rmc = srv.CreateEthernetLink(dtRMC70, "192.168.0.22")
This could be rewritten slightly more compactly as follows:
Dim srv As New RMCLinkServer
Dim rmc As RMCLink
Set rmc = srv.CreateEthernetLink(dtRMC70, "192.168.0.22")
Notice that the type of srv is RMCLinkServer, and the type of rmc is RMCLink. This style of declaration informs the compiler of the type so that it can do type checking and generate more efficient code throughout the program.
Here is an example of late binding for a comparison. DO NOT DO THIS!!!
Dim
srv ' DO NOT DO THIS!!! No type is specified.
Dim rmc ' DO NOT DO THIS!!! No type is specified.
Set srv = CreateObject("RMCLink.RMCLinkServer")
Set rmc = srv.CreateEthernetLink(dtRMC70, "192.168.0.22")
In order to use early binding, the Visual Basic project must know how the RMCLink COM component is defined. This is done by adding a reference to the RMCLink Type Library.
To add this reference:
In Visual Basic 5.0 or 6.0, open your project.
On the Project menu, click References.
Under Available References, scroll down until you find the RMCLink Type Library.
Check the box next to the RMCLink Type Library.
Click OK.
To demonstrate that you correctly added the reference to RMCLink, check to see if the RMCLink COM component appears in the Object Browser:
On the View menu, click Object Browser.
In the top-most drop-down list, select RMCLinkLib.
You should now be able to browse the classes and enumerations included in the RMCLink COM component.
Close the Object Browser when you are done.
As is common for all languages, the first step is to create an instance of the RMCLink class. This is a two step process: first create an RMCLinkServer object, then use that object to create the appropriate type of RMCLink object. The following lines demonstrate how this is done in Visual Basic:
Dim
srv As New RMCLinkServer
Dim rmc As RMCLink
Set rmc = srv.CreateEthernetLink(dtRMC70, "192.168.0.22")
The first two lines use early binding to declare two typed object references. The first line declares the RMCLinkServer object, and the second line declares the RMCLink object. Notice that the New keyword in first line indicates that the first time srv is used the object will be created. Notice that this keyword cannot be used on the RMCLink declaration line since this object is not directly creatable.
The third line actually does the work. First, because it is the first use of srv, the RMCLinkServer object is created and its reference is stored in srv. Then, the CreateEthernetLink method is called to create a link for communicating with an RMC70 at IP address 192.168.0.22.
Notice that if the reference to the RMCLink Type Library has not been added to the project (described above), then these lines will fail, since the Visual Basic compiler will not recognize the RMCLink types.
Notice that although your program works the same whether you call ReadLFile or ReadLFile_Script, the latter is much less efficient and should be only used by languages that cannot use ReadLFile (e.g. VBScript and JScript). Similarly, Visual Basic should use ReadFFile instead of ReadFFile_Script.
Notice that although most Visual Basic samples in this documentation control the entire lifetime of the RMCLink object within a single function, this is often not the most efficient way of using the RMCLink control. Generally, when you first want to connect to a controller, you will create the RMCLink object and call its Connect method. This RMCLink object should be located outside of the function or subroutine that creates and connects it, so that it can be used by other functions and subroutines to read or write from it. The walkthrough demonstrates how this might be done.
This walkthrough will create a simple application in Visual Basic 5.0 or 6.0 for reading the Target and Actual Positions from either axis 0 or axis 1 of an RMC70. The project developed in this walk-through is also included as a Visual Basic project in the RMCLink example projects.
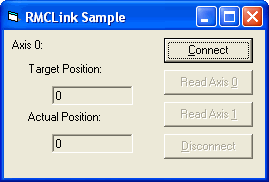
The final application will look like this:
Open the Visual Basic 5.0 or 6.0 IDE.
If the New Project wizard opens on startup, then on the New tab, select Standard EXE and click Open. Skip to step 2.
On the File menu, click New Project.
In the New Project window, select Standard EXE.
Click OK.
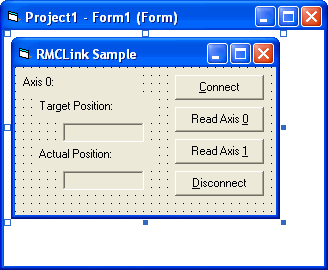
Add controls to the Form1 so that the form looks approximately like this, using the properties described below:
For the Form, use the default properties except for the following changes:
Form1 Form
|
Caption |
RMCLink Sample |
For the controls in the first column, from top to bottom, use the default properties except for the following changes:
axisLabel Label
|
(Name) |
axisLabel |
|
Caption |
Axis 0: |
Label1 Label
|
Caption |
Target Position: |
tarPosValue TextBox
|
(Name) |
tarPosValue |
|
BackColor |
System | Button Face |
|
Locked |
True |
|
TabStop |
False |
|
Text |
(blank) |
Label2 Label
|
Caption |
Actual Position: |
actPosValue TextBox
|
(Name) |
actPosValue |
|
BackColor |
System | Button Face |
|
Locked |
True |
|
TabStop |
False |
|
Text |
(blank) |
For the controls in the second column, from top to bottom, use the default properties except for the following changes:
connectButton CommandButton
|
(Name) |
connectButton |
|
Caption |
&Connect |
|
TabIndex |
0 |
readAxis0Button CommandButton
|
(Name) |
readAxis0Button |
|
Caption |
Read Axis &0 |
|
TabIndex |
1 |
readAxis1Button CommandButton
|
(Name) |
readAxis1Button |
|
Caption |
Read Axis &1 |
|
TabIndex |
2 |
disconnectButton CommandButton
|
(Name) |
disconnectButton |
|
Caption |
&Disconnect |
|
TabIndex |
3 |
You can test the application by, on the Run menu, clicking Start. The buttons do nothing yet.
In order to use early binding, which this project does, we need to add a reference to the RMCLink Type Library:
On the Project menu, click References.
Under Available References, scroll down until you find the RMCLink Type Library.
Check the box next to the RMCLink Type Library.
Click OK.
We need to define a global variable in the Form1 module to our RMCLink object. Open the Code View of the Form1 module, and type the following at the top of the code:
|
Top of Form1 Module |
Option Explicit Dim rmc As RMCLink |
The Option Explicit statement is optional, but recommended as it helps catch typos earlier in many cases.
The declaration of the rmc variable as an RMCLink object reference will be used by each of the handler functions added in later steps.
The previous step defined the rmc variable. However, we have not yet created an instance of it nor used it in any other way. We will now add two Form handlers, one for Load and one for Unload.
The Load handler will create an instance of the RMCLink class. This way all other handlers in our form can count on this object existing.
|
Form_Load Handler |
Private Sub Form_Load() Dim srv As New RMCLinkServer Set rmc = srv.CreateEthernetLink(dtRMC70, "192.168.0.22") ' Since we are disconnected to start, enable the buttons accordingly. connectButton.Enabled = True readAxis0Button.Enabled = False readAxis1Button.Enabled = False disconnectButton.Enabled = False End Sub |
Notice that the last four lines of this subroutine simply enable the Connect button and disable the other buttons since they can't be used until the link has been connected.
The Unload handler will simply make sure that the RMCLink object is disconnected. This is not strictly necessary since when the application closed the RMCLink object is released, which will disconnect it from the controller, but it is good practice nonetheless.
|
Form_Unload Handler |
Private Sub Form_Unload(Cancel As Integer) On Error Resume Next rmc.Disconnect End Sub |
Notice that the On Error Resume Next statement makes this subroutine ignore any error that might occur when disconnecting, since we don't actually care at this point; the user asked to close the form, so we will let them.
You can test the application by, on the Run menu, clicking Start. The buttons still do nothing, but they should be properly enabled on startup.
Next, we will handle the user clicking the Connect and Disconnect buttons.
When the Connect button is clicked, we make a call to RMCLink.Connect. However, since this method can fail if the controller cannot be connected to, we need to handle the error case. Therefore, an On Error GoTo statement is added to the start of the subroutine so that we can display an error message when the error occurs instead of crashing the application. Finally, if we successfully connect, we enable the buttons that required us to be connected and disable the Connect button.
|
connectButton_Click Handler |
Private Sub connectButton_Click() On Error GoTo HandleError rmc.Connect ' We have successfully connected, so update which buttons are enabled. readAxis0Button.Enabled = True readAxis1Button.Enabled = True disconnectButton.Enabled = True connectButton.Enabled = False Exit Sub HandleError: MsgBox "Communication Error #" & Err.Number & ": " & Err.Description End Sub |
When the Disconnect button is clicked, we make a call to RMCLink.Disconnect. This function will always succeed, provided we don't call it when the link is already disconnected, but we have covered that case by correctly enabling the command buttons. After disconnecting, we disable the buttons that require a connection to be established and re-enable the Connect button.
|
disconnectButton_Click Handler |
Private Sub disconnectButton_Click() rmc.Disconnect ' We have successfully disconnected, so update which buttons are enabled. connectButton.Enabled = True readAxis0Button.Enabled = False readAxis1Button.Enabled = False disconnectButton.Enabled = False End Sub |
You can test the application by, on the Run menu, clicking Start. The Connect and Disconnect buttons should now work, although the Read Axis 0 and Read Axis 1 buttons still do nothing.
The final step is to implement the handlers for the Read Axis 0 and Read Axis 1 buttons. Both functions do the same things, except that they set the axisLabel text differently, and they read from different status files.
These methods start by setting up our own error handler using the On Error GoTo statement. Again, we cannot prevent the ReadFFile method calls from failing if the cable is disconnected, so we need to keep the application from crashing in this case. This handler displays an error message, as before, but it also calls the disconnectButton_Click handler. This is because a failed read or write does not disconnect the connection, and plus we want to return the button enabled states to being disconnected.
The rest of the body of these methods simply reads the values and updates the text boxes and axis label accordingly.
|
readAxis0Button_Click Handler |
Private Sub readAxis0Button_Click() On Error GoTo HandleError Dim data As Variant axisLabel = "Axis 0:" ' Read and update the Target Position (F8:53) data = rmc.ReadFFile(fn70StatusAxis0, 53, 1) tarPosValue = data(0) ' Read and update the Actual Position (F8:8) data = rmc.ReadFFile(fn70StatusAxis0, 8, 1) actPosValue = data(0) Exit Sub HandleError: disconnectButton_Click MsgBox "Communication Error #" & Err.Number & ": " & Err.Description End Sub |
|
readAxis1Button_Click Handler |
Private Sub readAxis1Button_Click() On Error GoTo HandleError Dim data As Variant axisLabel = "Axis 1:" ' Read and update the Target Position (F9:53) data = rmc.ReadFFile(fn70StatusAxis1, 53, 1) tarPosValue = data(0) ' Read and update the Actual Position (F9:8) data = rmc.ReadFFile(fn70StatusAxis1, 8, 1) actPosValue = data(0) Exit Sub HandleError: disconnectButton_Click MsgBox "Communication Error #" & Err.Number & ": " & Err.Description End Sub |
You can now run the complete application. On the Run menu, click Start.
See Also
RMCLink COM Component | How Do I Overview | RMCLink Component
Copyright (c) 2024 Delta Computer Systems, Inc. dba Delta Motion