The Monitor port is used primarily to communicate from RMCTools to the RMC. The monitor port type varies by RMC:
|
Controller |
Monitor Port |
|
USB |
|
|
RS-232 |
|
|
RS-232 |
|
|
USB |
|
|
USB |
Connecting from RMCTools to the RMC
Use a procedure based on your RMC type and connection method:
USB (RMC75E, RMC150E, RMC200)
Make sure RMCTools is installed first.
Connect a USB cable from the PC to the USB Monitor port on the RMC.
Open a project in RMCTools.
In the Project Pane, right-click the controller and click Connection Path.
Choose USB and click Browse. RMCTools will list all the RMCs connected via USB. If your RMC does not appear, try disconnecting and reconnecting the USB cable.
Choose the desired RMC from the list. If you have multiple RMCs connected via USB, use the Device ID to determine which one to choose from the list. Notice that the Device ID is the serial number for the RMC75 and MAC address for the RMC150. Click OK.
Click Go Online.
Ethernet (RMC75E, RMC150E, RMC200)
Use these steps to connect from RMCTools to the RMC using Ethernet:
Connect the RMC75 and the PC to the same Ethernet network. For more information, see the RMC Ethernet Setup and Setting Up a Standalone TCP/IP Network topics.
Open a project in RMCTools.
In the Project Pane, right-click the controller and click Connection Path.
Choose Ethernet and click Browse. RMCTools will list all the RMCs connected via Ethernet. If your RMC does not appear in the box, see the Troubleshooting RMCTools Ethernet Connection topic.
Choose the desired RMC. If you have multiple RMCs connected to the Ethernet network, use the part number and MAC address to determine which one to choose from the list.
If the RMC does not have an IP address, click the Configure Device button to set the IP Address settings.
Click OK.
Click Go Online.
RMC75P or RMC75S
Use these steps to connect from RMCTools to the RMC using the serial monitor port:
Connect a DB-9 null-modem cable from the PC to the RS-232 Monitor port on the RMC. See the RS-232 Monitor Port Wiring section below for cable details.
Open a project in RMCTools.
In the Project Pane, right-click the controller you wish to connect to and click Connection Path.
Click Go Online.
USB Monitor Port Details (RMC75E, RMC150E, RMC200)
The USB Monitor port is a Universal Serial Bus (USB) "B" port. RMCTools communicates with the RMC75E and RMC150E via the USB Monitor port. The USB Monitor port cannot be used for any other purpose.
Use a standard USB "A" to "B" cable to connect your PC to the USB Monitor port.
The USB port is intended for configuration, programming, and troubleshooting purposes only. Do not leave it connected during normal machine operation.
The USB port is sensitive to electrical noise. In some cases communication may be lost. If communication cannot be reestablished, you may need to unplug and reconnect the cable. USB connector shielding is grounded through case ground.
RS-232 Monitor Port (RMC75S, RMC75P)
The RS-232 Monitor port is a DTE DB9 RS-232 serial port. RMCTools communicates with the RMC75S or RMC75P via the Monitor port. The RS-232 Monitor port may also be used to communicate with other devices via the DF1 serial protocol.
Using the RS-232 Monitor Port for Communication with a Host Controller
The RS-232 Monitor Port is primarily intended for communication with RMCTools on a PC. However, the RS-232 Monitor port may be used to communicate with host devices, such HMIs, PLCs, etc. The RS-232 Monitor port can be used at the same time as the other communication port, whether it be Serial or PROFIBUS.
Since the RS-232 Monitor Port communication protocol is fixed at the settings listed below, it can only communicate with devices that support the DF1 protocol. For details on how to use the RS-232 Monitor port for communications, see the Using Serial Communications topic.
RS-232 Monitor Port Settings:
DF1 Full-Duplex
38400 Baud
8 Data Bits
No Parity
1 Stop Bit
CRC
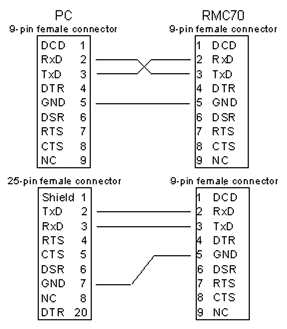
RS-232 Monitor Port Wiring
Cable
Must be a female 9-pin DB9 on the RMC end. The following options are available for the cable between the PC and the RMC75 serial Monitor port:
Generic null-modem (female on both ends) serial cable
Allen-Bradley PLC serial cable
Modicon Modbus cable with a 9-pin male-to-female gender changer
Siemens SIMATIC 505 Programmable Controller serial cable
Any cable will work if pins 2, 3, and 5 on the RMC75-end of the cable are connected as shown below.
Pin-Out
Pin assignments on the RS-232 Monitor Port:
|
Pin # |
RS-232 Function |
|
1 |
DCD- Not used by RMC75 |
|
2 |
RxD - Receive Data |
|
3 |
TxD - Transmit Data |
|
4 |
DTR - Not used by RMC75 |
|
5 |
GND - Common |
|
6 |
DSR - Not used by Monitor Port |
|
7 |
RTS - Not used by Monitor Port |
|
8 |
CTS - Not used by Monitor Port |
|
9 |
Not Connected |
Wiring
Note:
The DB9 shell is connected to the RMC75 Case.
For more details, see the RS-232 Wiring for the RMC75 topic.
See Also
Copyright © 2026 Delta Computer Systems, Inc. dba Delta Motion