Open topic with navigation
Setting Up a Standalone TCP/IP Control Network
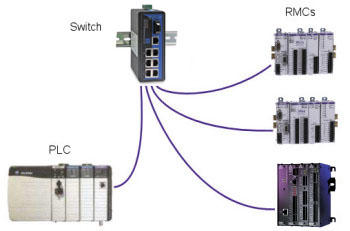
Many industrial applications require a standalone Ethernet network for machine control, for example, a PLC communicating with several RMCs and an HMI. This topic describes how to easily set up a standalone Ethernet network using TCP/IP.
Before reading this topic, make sure you understand the Understanding IP Addressing topic.
Note:
This topic is intended only for new networks that will not be connected via a router to another network. If you will be adding an RMC to an existing network or you will be creating a new network that will be connected via a router to another network, consult your network administrator.
To set up a stand-alone network:
-
Wire the Network
The RMC75E and RMC150E use the IEEE 802.3 100BaseT hardware standard. This means it runs at 100Mbaud on twisted pair wiring rated Category 5 or higher, and uses RJ45 connectors. Twisted pair networks generally use a star topology, which means that each device is wired to a single switch device, as illustrated below:
Care should be taken to use a high-quality switch that will support the temperature, noise, vibration, and other environmental requirements of the application. It is also important to use a switch rather than a hub to avoid collisions, which reduce the determinism of the network. Both switches and Category 5 (commonly called CAT5) cabling are readily available from network supply companies.
-
Select a network address and subnet mask.
By convention, the address ranges below are intended to be used for private networks. An address from these ranges is a good choice for the network address of a stand-alone control network.
-
10.0.0.0 - 10.255.255.255
-
172.16.0.0-172.31.255.255
-
192.168.0.0 - 192.168.255.255
Example:
The user decided to use the 192.168.0 address. Because this network address is 24 bits long, the subnet mask will be 255.255.255.0. This leaves 254 local addresses (remember that addresses 0 and 255 are reserved) for an IP address range of 192.168.0.1 to 192.168.0.254.
-
Assign local addresses for each device.
The IP address range from step 2 provides 254 IP addresses that can be assigned to the network devices. When assigning addresses, ensure that all devices have unique address. To avoid assigning the same IP address twice, record the IP address assignments for use later when you need to add or replace device.
By convention, local address 1 (IP address 192.168.0.1 in our new example network in the previous step) is used as the default gateway. Even if you do not have gateway/router, it is a good idea to leave that address unassigned. Assign your first device (perhaps a PLC) 192.168.0.2, assign your second device (perhaps an RMC) 192.168.0.3, etc.
-
Enter the network parameters into each device.
The method of assigning the network parameters varies for each type of device. Use the IP address you have assigned, a subnet mask of 255.255.255.0, and leave the default gateway blank for each device. See RMC Ethernet Setup for details on editing these parameters on the RMC, and consult the manuals of the other devices on your network for details on setting up their TCP/IP parameters.
See Also
Understanding IP Addressing | Ethernet Overview
Send comments on this topic.
Copyright © 2026 Delta Computer Systems, Inc. dba Delta Motion