Redundant feedback can be implemented in the RMC by using Custom Feedback. When the controller detects that one transducer has problems, it can immediately switch to another feedback on the fly, even in the middle of motion. The user has the flexibility to program the logic that determines which feedback should be used, making redundancy using any number of transducers possible.
Tip: The Examples section of Delta's online forum includes a Redundant Feedback example. You can use that example to help you get started.
Setting Up Redundant Feedback
Read the Custom Feedback topic before completing this procedure.
1. Define a Control Axis with Custom Input
Define a control axis with the feedback type required (position, velocity, pressure, force, or acceleration). For the feedback source, choose Custom.
2. Define the Reference Axes
Create reference axes for each physical feedback input to be used.
3. Configure the Reference Axes
Configure the feedback parameters for the reference axes and verify that the transducers give valid readings.
Set the Scale and Offset so that the reference axes provide correct values throughout the entire range of feedback.
4. Create a Variable
Create a variable in the Variable Table for reporting which feedback is being used. For example, ActiveFeedback.
5. Create a User Program
Create a single-step user program with a Jump Link Type and a Repeat Jump To location.
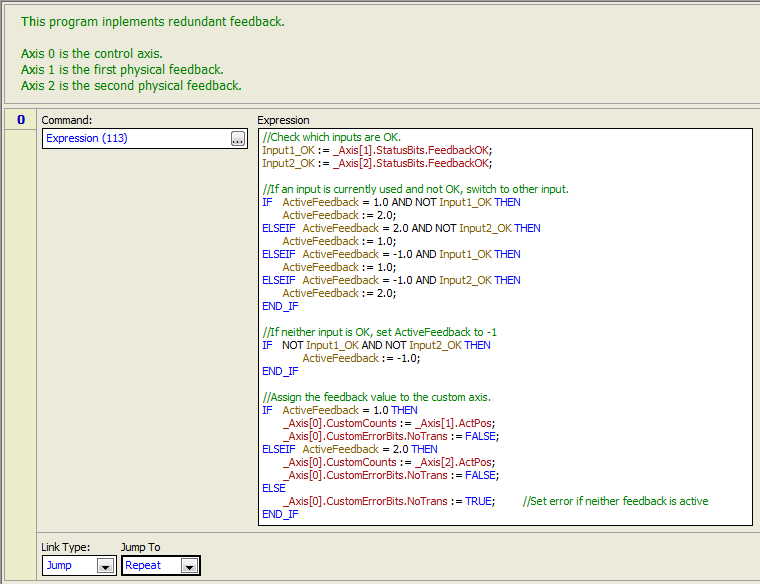
Add an Expression (113) command.
Create an expression that implements the logic for selecting which feedback to use. For example, for a redundant system using two transducers, you may wish to:
Check which feedback inputs are valid. The TransducerOK status bit is useful for this.
If a feedback input is not valid, select the other input.
After selecting the feedback input to be used, assign the value of the feedback to the Custom Counts (or Secondary Custom Counts for secondary inputs) register of the control axis.
If none of the feedback inputs are valid, make sure to set the CustomErrorBits.NoTrans bit.
For example:
6. Make Sure the User Program Always Runs
As described in more detail in the Custom Feedback topic, do the following:
Set the RMC to start in RUN mode.
Use a _FirstScan condition in the Program Triggers to start the user program when the RMC enters RUN mode.
Make sure the task does not stop when an axis halts. This can be set in the Programming Properties, on the Halts page.
7. Tune the Axis
Tune the axis manually (auto-tuning does not work in RUN mode).
8. Program your application
Program the rest of your application. Keep in mind that if you want other user programs to run even if one feedback transducer fails, you will need to set the Programming Properties Halts page such that the tasks running those user programs do not halt.
See Also
Copyright © 2026 Delta Computer Systems, Inc. dba Delta Motion