This topic provides two examples on how to program the RMC to jog on a position axis. Each example uses closed-loop moves to jog the axis, which requires that the axis has already been tuned. The examples can of course be modified to do open-loop motion.
Description
Jogging an axis typically refers to moving an axis forward or backward while a button is pressed. As soon as the button is released, the axis stops.
There are two main types of buttons that can be used for this application:
Momentary "buttons" on a touch panel HMI.
In this case, the HMI must be programmed to write a value to a bit or register in the RMC when it is pressed, and write another when is released.
Note:
For help on how to communicate with the RMC via an HMI, see the Communicating with HMIs topic.
Momentary voltage switches, buttons, or a joystick.
In this case, the switches, buttons, or joystick must be wired to two discrete inputs on the RMC.
Method
Programming the RMC for the jog function consists of the following steps:
Set up the buttons
If you are using an HMI, this requiresplacing two buttons on the screen; one to move the axis forward, and another to move it backward. Each button press should cause a value to be written to a variablein the RMC.
If you are using a joystick, or buttons or switches, the outputs should be wired to two discrete inputs on the RMC.
Create three User Programs:
User Program 1 will consist of one step that moves the axis forward.
User Program 2 will consist of one step that moves the axis backward.
User Program 3 will consist of one step that stops the axis.
Create four Program Triggers:
The first condition will continuously monitor the discrete input (or variable register) for moving the axis forward. When it turns "on", it will start User Program 1, which will move the axis forward.
The second condition will continuously monitor the discrete input (or variable register) for moving the axis backward. When it turns "on", it will start User Program 2, which will move the axis backward.
The third condition will continuously monitor the discrete input (or variable register) for moving the axis forward. When it turns "off", it will start User Program 3, which will stop the axis.
The fourth condition will continuously monitor the discrete input (or variable register) for moving the axis backward. When it turns "off", it will start User Program 3, which will stop the axis.
Example 1: Using a "button" on an HMI
The example will follow the method described above.
Set up the buttons
First, the user sets up two momentary buttons on the HMI, called Jog Forward and Jog Back. As with most HMIs, this momentary button can only write to a bit. The RMC supports writing to bits with the Allen-Bradley DF1 protocol or Modbus/RTU or Modbus/TCP. This examples shows using DF1. The momentary button writes a "1" when it is pressed, and a "0" when it is released.
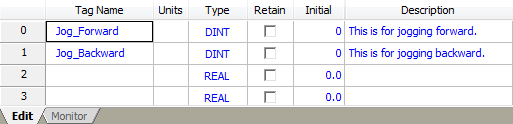
The user programs the Jog Forward button in the HMI to write to bit zero in the RMC variable 0 (address F56:0/0). In the RMC, the user named this variable Jog_Forward and defined it as a DINT (double integer).
The user also programs Jog Back button in the HMI is programmed to write to bit zero in the RMC variable 1 (address F56:1/0). In the RMC, the user named this variable Jog_Back, and defined it as a DINT type (double integer).
It is very important that these variables be declared as DINT type, because later the user will use the value of the entire register. If it were a REAL (floating point), it would be unknown what value it would take on if bit 0 were changed.
After the user has done this, the variable table looks like this:
Create three User Programs
The user created three programs. The speeds and accels were chosen based on the system to be controlled. The user chose positions that are shortly before the end of the stroke, so if the operator does not release the button, the axis will still stop before hitting the end.


Create four Program Triggers conditions:
Since the HMI writes to bit 0 of the variables, the value of the entire variable will be either zero or one. Therefore, the user made the Program Trigger conditions compare the entire variables to zero or one.
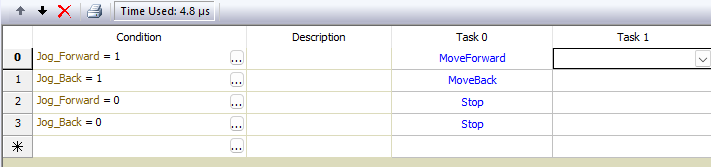
Now, when the operator presses and holds the Jog Forward button on the HMI, it will write a 1 to bit 0 of the Jog_Forward variable. The Program Trigger sees that the Jog_Forward variable became 1, so it starts the User Program MoveForward. When the operator releases the Jog Forward button on the HMI, it will write a 0 to bit 0 of the Jog_Forward variable. The Program Trigger sees that the Jog_Forward variable became 0, so it starts the User Program Stop.
The Jog Back button works like the Jog Forward button.
Example 2: Using a button or joystick with a discrete input
The user chooses to use a 3-position switch. When it is pushed to the right, one output goes high. When it is pushed to the left, the other output goes high. When it's in the middle, both outputs are low.
Set up the discrete inputs
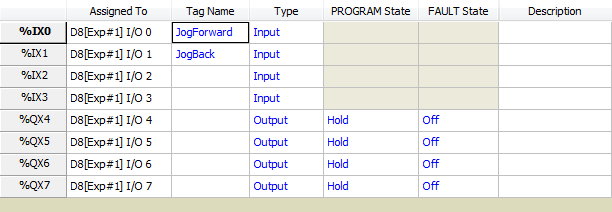
The user wires the two outputs from the switch to discrete inputs on the RMC. In this example, the user chooses inputs 0 and 1 on the RMC75 D8 expansion module. Any general inputs on the RMC75 or RMC150 will work.
In the Discrete I/O Configuration dialog, the user defines discrete I/O points 0 and 1 as inputs and calls them Jog_Forward and Jog_Back.
After the user has done this, the Discrete I/O Configuration looks like this:
Create three User Programs
The user created three programs. The speeds and accels were chosen based on the system to be controlled. The user chose positions that are shortly before the end of the stroke, so if the operator does not release the button, the axis will still stop before hitting the end.
Create four Program Trigger conditions:
If an input is on, it is TRUE. If is off, it is FALSE. Each condition compares the state of an input to TRUE or FALSE. The user created four Program Trigger conditions as shown below:

Now, when the operator pushes the switch to the right, the Jog_Forward input becomes TRUE. The Program Trigger sees that the Jog_Forward input became TRUE, so it starts the User Program MoveForward. When the operator releases the switch, it goes to its center position and the Jog_Forward input becomes FALSE. The Program Trigger sees that the Jog_Forward input became FALSE, so it starts the User Program Stop.
The Jog_Back input works like the Jog_Forward input.
See Also
Copyright © 2026 Delta Computer Systems, Inc. dba Delta Motion