This topic gives a simple example of how to create a curve using the Curve Add (82) command and the variable table. For more details on curves, see the Curves Overview and Curve Tool topics.
This procedure is for curves small enough to fit in the Variable Table, and the points are spaced evenly on the X-axis (or time axis). It can be used for position, pressure, or force, and can be used for a time-based curve or a master-based curve.
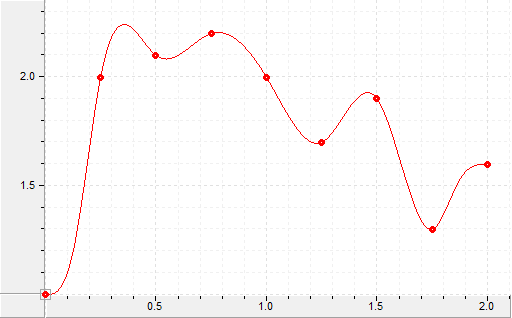
This example will create an example curve with nine points. The X-axis (or time axis) points are evenly spaced, and the end points have zero velocity (the axis will be stopped at the ends).
Determine the Curve Points
Determine the distance or time between points on the X-axis (or time axis), and determine each point on the Y-axis. This example will use a time between points of 0.25, and nine Y-axis points as shown below:
|
X-axis (time) |
0.00 |
0.25 |
0.50 |
0.75 |
1.00 |
1.25 |
1.50 |
1.75 |
2.00 |
|
Y-axis |
1.0 |
2.0 |
2.1 |
2.2 |
2.0 |
1.7 |
1.9 |
1.3 |
1.6 |
When determining the curve points, keep in mind that the axis that follows the curve must be at the starting Y-axis position before the Curve Start command is issued. That is, the first point is where the axis must be at the start.
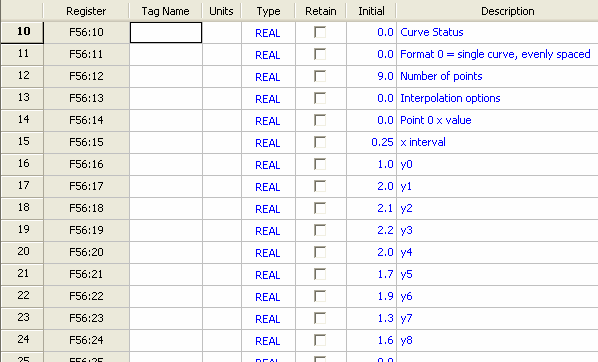
Create the Curve Data in the Variable Table
Several different curve data formats are available, as described in Curve Data Formats. This procedure uses the simplest format: Single Curve - Evenly-Spaced Points:
|
Offset |
Description |
|
0 |
Curve Status (set to 0, the RMC will change this value) |
|
1 |
Curve Format (0 = Single Curve - Evenly-Spaced) |
|
2 |
Number Points |
|
3 |
Interpolation Options (set to 0 for none) |
|
4 |
Point 0 x value (set to 0 for time, or the starting master x position for master-based) |
|
5 |
x interval (distance between x points) |
|
6 |
y0 (first y position) |
|
7 |
y1 (second y position) |
|
: |
: |
|
5+n |
y(n-1), n = number of points (nth y position) |
Place the curve data anywhere in the Variable Table. The curve data for this example starts at F56:10. Adding descriptions helps keep track of what the data is for. By entering this data into the initial values of the Variable Table, the curve data can be saved to flash. Notice that the curve in the Curve Store cannot be saved to Flash, but the curve data in the initial values in the Variable Table can be. Optionally, you can set all the curve data variables to Retained, and they will be remembered between power cycles without requiring a Flash update.
Variable Table:
You can enter the curve data in the Variable Table using RMCTools, or you can write the data from a PLC or HMI. If you use a PLC or HMI, it is a good idea to first enter the Descriptions in the Variable Table using RMCTools so that you can easily troubleshoot it.
Send the Curve Add (82) Command
Send the Curve Add (82) command to instruct the RMC to create a curve using the data in the Variable Table and the Curve ID specified by the command.
For the example curve, send the following command:
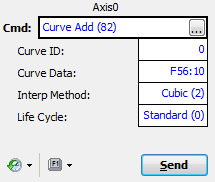
This command tells the RMC that the Curve ID will be zero (0), and the curve data starts at F56:10. The interpolation method is cubic (the most common method), and the life cycle Standard means you can run the command as many times as you would like. When you send this command, the curve will be placed in the Curve Store with an ID of 0.
Notice if you wish to be able to save the curve to Flash, you should choose the Permanent Life Cycle option. Only curves created with the Permanent Life Cycle option or downloaded from the Curve tool can be saved to Flash.
After the Curve Add (82) command has been added the curve, the data in the Variable Table is no longer needed. You can, for example, use it to add additional curves.
Wait for the Curve Status to be 3
Wait for the Curve Status to be 3. This indicates that the RMC has completed processing the curve data and has created the curve. The Curve Status is the first item you entered in the curve data in the Variable Table. Notice that you will need to look in the Monitor tab of the Variable Table Editor to see the real-time value.
If the Curve Status changes to a value of 10 or greater, it indicates an error. See the Curve Status Error Codes topic for a list of possible error values.
If you are using the Curve Add (82) command in a user program, you should make a Link Type that waits for the Curve Status to be 3 before continuing. The Curve Status will be the Current Value of the first variable in the curve data you entered in the variable table. In this example, it would be variable 10. You can assign a tag name to variable 10 to make it easier to find.
Move the axis to the first point.
Before you can follow the curve, the Target Position (Target Pressure or Force) of the axis must be at the first Y-axis position of the curve, which is 1.0 in this example. This can be done by using a Move Absolute command to move the axis to 1.0. For following a pressure or force curve, you will need to move the Target Pressure/Force to the first point’s Y value.
Notice that you can move the axis to the first point before the Curve Status is 3.
Send the Curve Start Command
To start following a curve, send the Curve Start (86) command for a position curve, or the Curve Start (Prs/Frc) (87) command for a pressure or force curve. If the axis is not at the first point of the curve, an error will result and the curve will not start.
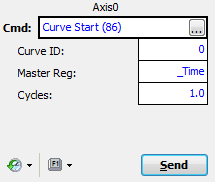
This command will start curve 0, will follow it based on time, and will follow it once.
For more details, see the Creating Curves Using the Curve Add Command and Curves Overview topics.
Tips for Using Curves from a PLC or HMI
For more efficient communication, you can make a user program that issues the Curve Add and Curve Start commands. Then the host controller need only start a user program, instead of issuing several commands. After writing the data to the Variable Table, start the user program. After the user program issues the Curve Add command, it must wait for the Curve Status to be 3 before issuing the Curve Start command.
See Also
Curves Overview | Curve Tool Overview | Curve Start (86) | Curve Start (Prs/Frc) (87) | Curve Interpolation Methods and Options | Creating Curves Using the Curve Add Command | Creating Large Curves Using the Curve Add Command | Curve Data Formats
Copyright © 2025 Delta Computer Systems, Inc. dba Delta Motion