How to: Use from Visual C++ |
Visual C++ native code users should use the RMCLink C++ Wrapper Class instead of using the RMCLink COM Component directly. Specifics on using this component within C++ project code are described below, including a step-by-step walkthrough. The project developed in the walkthrough is included as a Visual C++ project in the RMCLink example projects.
The CRMCLink C++ wrapper class greatly simplifies using the RMCLink COM component in C++ projects. This wrapper class is distributed in source code form. These source files should be added to your project and compiled in. The following instructions describe how to add this class to your project.
Start Visual Studio.
Open or create a new C++ project.
To create a new MFC C++ project in Visual Studio 2022 or newer:
Click File – New – Project.
Set the language filter to C++.
Select MFC App (recommended).
Click Next.
Enter a project name and specify the target folder.
Click Create.
In the next steps of the wizard, select the desired options.
Click Finish.
Copy RMCLink.h and RMCLink.cpp from the CPP sub-folder of the RMCLink install folder (by default, C:\Program Files\RMCLink\CPP\) into your C++ project folder.
Add these files to your project.
On the Project menu, click Add Existing Item.
Select RMCLink.h and RMCLink.cpp and click Open.
Visual Studio 2017 and Newer
For Visual Studio versions from Visual Studio 2017 and newer, for a C++ project using Microsoft Foundation Classes (MFC, recommended), the RMCLink.cpp source file must include four header files: the pre-compiled header a) pch.h, b) framework.h, c) the header RMCLink.h that was added to the project above, and d) the standard Windows header file comdef.h. The files pch.h, pch.cpp, and framework.h will be added to the project by Visual Studio during the creation of the project.
If your application uses a pre-compiled header, then make sure that your copies of pch.h, pch.cpp and framework.h satisfy these requirements.
It must include Windows.h either directly or indirectly. MFC applications include Windows.h indirectly through afx.h. ATL applications include Windows.h indirectly through atlbase.h.
It cannot define WIN32_LEAN_AND_MEAN. This macro will eliminate some necessary COM definitions.
If it does not use a pre-compiled header, then replace the #include <pch.h> and #include <framework.h> lines in RMCLink.cpp with the following line:
#include <Windows.h>
Visual Studio 2015 and Older
For Visual Studio versions prior to Visual Studio 2017, the RMCLink.cpp source file includes three header files: the pre-compiled header stdafx.h, the header RMCLink.h that was added to the project above, and the standard Windows header file comdef.h. The last two should always be found correctly, but the stdafx.h pre-compiled header may cause problems in your application.
If your application uses a pre-compiled header, then make sure that your copy of stdafx.h satisfies these requirements.
It must include windows.h either directly or indirectly. MFC applications include windows.h indirectly through afx.h. ATL applications include windows.h indirectly through atlbase.h.
It cannot define WIN32_LEAN_AND_MEAN. This macro will eliminate some necessary COM definitions.
If it does not use a pre-compiled header, then replace the #include <stdafx.h> line in RMCLink.cpp with the following line:
#include <windows.h>
The CRMCLink wrapper class wraps the RMCLink COM component. Therefore, it will internally create an instance of the RMCLinkServer COM class using the CoCreateInstance API function. This function requires that the COM subsystem has been initialized using CoInitialize, CoInitializeEx, or OleInitialize. The CRMCLink wrapper class does not make these calls for you in order to give your control as to how it is done. For example, ATL may make this call for you, or you may want to specify which apartment (single- or multi-threaded) you want the thread to be in.
Refer to the samples and walkthrough for an example of how to initialize the COM subsystem.
Again, because the CRMCLink C++ class is wrapping the RMCLink COM component, you will need to install the RMCLink COM component on the end-user PC before your program using the CRMCLink class will run.
Use one of the static CRMCLink::CreateEthernetLink, CRMCLink::CreateSerialLink or CRMCLink::CreateUSBLink methods to create a new instance of the CRMCLink class; because there is no public constructor, the new keyword cannot be used. The following line demonstrates how this is done in Visual C++.
CRMCLink* pRMC = CRMCLink::CreateEthernetLink(CRMCLink::dtRMC70, _T("192.168.0.22"));
Notice that this, of course, requires that the RMCLink.h and RMCLink.cpp files have been added to the project and that RMCLink.h is included by all source files using CRMCLink.
Notice that although most Visual C++ samples in this documentation control the entire lifetime of the CRMCLink object within a single function, this is often not the most efficient way of using the CRMCLink class. Generally, when you first want to connect to a controller, you will create the CRMCLink object and call its Connect method. This CRMCLink object should be located outside of the function or subroutine that creates and connects it, so that it can be used by other functions and subroutines to read or write from it.
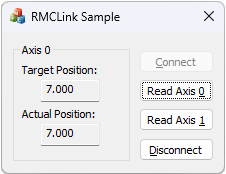
This walkthrough demonstrates how to create an MFC-based C++ application that uses the RMCLink component through the CRMCLink wrapper class. This application will read the Target and Actual Positions from either axis 0 or axis 1 of an RMC70. The project developed in this walk-through is included as a Visual C++ project in the RMCLink example projects.
The final application will look like this:
Start by using the MFC application wizard to create the basic dialog-based application. The wizards vary somewhat between versions of Visual C++. A procedure that is mostly correct is given below, although different versions may require some adaptation in navigating the project creation process. For Visual Studio 2019 and newer, entering "MFC App" into the search box can replace step 2. If you do not see any MFC project templates, you may need to install MFC support via the Visual Studio Installer.
On the File menu, point to New, and then click Project. This will open the New Project wizard.
Under Project types, expand Visual C++, and then click MFC.
Under Templates, click MFC Application.
In the Name text box, type "RMCLinkSample".
In the Location text box, type the path where you want to save this project.
Click OK. The MFC Application Wizard will now start.
Select the Application Type page and make these changes:
Click the Dialog based button.
Select the User Interface Features page and make these changes:
Clear the check mark next to About box. This should only leave System menu checked.
In the Dialog title text box, type "RMCLink Sample".
Select the Advanced Features page and make these changes:
Clear the check mark next to ActiveX controls. This should only leave Common Control Manifest checked.
Click Finish.
We will now use the resource editor to modify the IDD_RMCLINKSAMPLE_DIALOG resource for our application.
The default template includes two buttons and one static control. Delete these default controls before adding the new controls.
Add controls to the dialog box template to look approximately like the following:
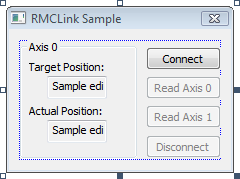
Use the default properties for each control, except as shown below:
IDC_GRP_AXIS Group-box Control
|
ID |
IDC_GRP_AXIS |
|
Caption |
Axis 0 |
|
(x,y) |
7,7 |
|
(WxH) |
78x73 |
IDC_STATIC Text Control
|
Caption |
Target Position: |
|
(x,y) |
13,19 |
|
(WxH) |
52x8 |
IDC_EDIT_TARPOS Edit Control
|
ID |
IDC_EDIT_TARPOS |
|
Read Only |
True |
|
Tabstop |
False |
|
(x,y) |
25,29 |
|
(WxH) |
40x14 |
IDC_STATIC Text Control
|
Caption |
Actual Position: |
|
(x,y) |
13,46 |
|
(WxH) |
50x8 |
IDC_EDIT_ACTPOS Edit Control
|
ID |
IDC_EDIT_ACTPOS |
|
Read Only |
True |
|
Tabstop |
False |
|
(x,y) |
25,56 |
|
(WxH) |
40x14 |
IDC_BTN_CONNECT Button Control
|
ID |
IDC_BTN_CONNECT |
|
Caption |
&Connect |
|
(x,y) |
91,11 |
|
(WxH) |
50x14 |
IDC_BTN_READ_AXIS0 Button Control
|
ID |
IDC_BTN_READ_AXIS0 |
|
Caption |
Read Axis &0 |
|
Disabled |
True |
|
(x,y) |
91,29 |
|
(WxH) |
50x14 |
IDC_BTN_READ_AXIS1 Button Control
|
ID |
IDC_BTN_READ_AXIS1 |
|
Caption |
Read Axis &1 |
|
Disabled |
True |
|
(x,y) |
91,47 |
|
(WxH) |
50x14 |
IDC_BTN_DISCONNECT Button Control
|
ID |
IDC_BTN_DISCONNECT |
|
Caption |
&Disconnect |
|
Disabled |
True |
|
(x,y) |
91,65 |
|
(WxH) |
50x14 |
Because the CRMCLink wrapper class uses the RMCLink COM component internally, we need to ensure that the COM subsystem is initialized before using the CRMCLink wrapper class. In an MFC application, this should be done in an override to the CWinApp::InitInstance virtual function.
When an application is done with the COM subsystem, it should call CoUninitialize. In an MFC application, this is best done in an override to the CWinApp::ExitInstance virtual function.
This function has not yet been overridden in our application, so you will need to add the ExitInstance method, both as a function prototype in RMCLinkSample.h and as a function implementation in RMCLinkSample.cpp. You can use Visual C++ wizards to add the virtual function override or add them manually.
Add the following lines to RMCLinkSample.h and RMCLinkSample.cpp:
|
Portion of RMCLinkSample.h |
...

class CRMCLinkSampleApp : public CWinApp
{
    ...

    virtual int ExitInstance();
};

...
|
|
Portion of RMCLinkSample.cpp |
...

BOOL CRMCLinkSampleApp::InitInstance()
{
    ::CoInitialize(NULL);

    ...
}

int CRMCLinkSampleApp::ExitInstance()
{
    ::CoUninitialize();
    return __super::ExitInstance();
}
|
Copy RMCLink.h and RMCLink.cpp from the CPP sub-folder of the RMCLink install folder (by default, C:\Program Files\RMCLink\CPP\) into your C++ project folder.
Add these files to your project.
On the Project menu, click Add Existing Item.
Select RMCLink.h and RMCLink.cpp and click Open.
Our dialog box will use the RMCLink object. Because it will be used from several different message handlers, we will declare a member variable to hold this reference for the life of the dialog box. We start by declaring the variable. We define a forward reference to the CRMCLink class to avoid pulling in the entire RMCLink.h file.
|
Portion of RMCLinkSampleDlg.h |
... // Forward reference. class CRMCLink; class CRMCLinkSampleDlg : public CDialog { ... // Implementation protected: HICON m_hIcon; CRMCLink* m_pRMC; ... }; |
We will also now add the RMCLink.h include file to RMCLinkSampleDlg.cpp since this module will actually use the class.
|
Portion of RMCLinkSampleDlg.cpp |
...

#include "stdafx.h"
#include "RMCLinkSample.h"
#include "RMCLinkSampleDlg.h"
#include "RMCLink.h"

...
|
We now have a CRMCLink pointer as a member variable. We will create the CRMCLink object in the CRMCLinkSampleDlg constructor, and destroy the object in its destructor. The MFC Application Wizard created a constructor but did not create a destructor. Modify RMCLinkSampleDlg.h and RMCLinkSampleDlg.cpp as shown:
|
Portion of RMCLinkSampleDlg.h |
...

class CRMCLinkSampleDlg : public CDialog
{
// Construction
public:
    CRMCLinkSampleDlg(CWnd* pParent = NULL); // standard constructor
    virtual ~CRMCLinkSampleDlg();

    ...
};
|
|
Portion of RMCLinkSampleDlg.cpp |
...

CRMCLinkSampleDlg::CRMCLinkSampleDlg(CWnd* pParent /*=NULL*/)
    :   CDialog(CRMCLinkSampleDlg::IDD, pParent)
{
    m_hIcon = AfxGetApp()->LoadIcon(IDR_MAINFRAME);

    // Create a CRMCLink object ready to link over TCP/IP to an
    //  RMC70 at IP address 192.168.0.22.
    m_pRMC = CRMCLink::CreateEthernetLink(CRMCLink::dtRMC70, _T("192.168.0.22"));
}

CRMCLinkSampleDlg::~CRMCLinkSampleDlg()
{
    // Destroy the CRMCLink object.
    delete m_pRMC;
}

...
|
We will now add handlers for the Connect and Disconnect buttons' BN_CLICK notification. Feel free to use the MFC wizards built in to Visual C++ to add these handlers, or manually enter the following code:
|
Portion of RMCLinkSampleDlg.h |
class CRMCLinkSampleDlg : public CDialog
{
    ...
    DECLARE_MESSAGE_MAP()
    afx_msg void OnBnClickedBtnConnect();
    afx_msg void OnBnClickedBtnDisconnect();
};
|
|
Portion of RMCLinkSampleDlg.cpp |
... BEGIN_MESSAGE_MAP(CRMCLinkSampleDlg, CDialog) ... ON_BN_CLICKED(IDC_BTN_CONNECT, OnBnClickedBtnConnect) ON_BN_CLICKED(IDC_BTN_DISCONNECT, OnBnClickedBtnDisconnect) END_MESSAGE_MAP() ... void CRMCLinkSampleDlg::OnBnClickedBtnConnect() { // Display the hourglass while we are trying to connect. CWaitCursor wc; HRESULT hr = m_pRMC->Connect(); if ( SUCCEEDED(hr) ) { // Ensure that the buttons are enabled/disabled accordingly. GetDlgItem(IDC_BTN_READ_AXIS0)->EnableWindow(); GetDlgItem(IDC_BTN_READ_AXIS1)->EnableWindow(); GetDlgItem(IDC_BTN_DISCONNECT)->EnableWindow(); GetDlgItem(IDC_BTN_CONNECT)->EnableWindow(false); } else { // Display an error message. CString str; str.Format(_T("Unable to connect. Error code=0x%08X"), hr); MessageBox(str, NULL, MB_ICONEXCLAMATION | MB_OK); } } void CRMCLinkSampleDlg::OnBnClickedBtnDisconnect() { // Ensure that we are disconnected. m_pRMC->Disconnect(); // Ensure that the buttons are enabled/disabled accordingly. GetDlgItem(IDC_BTN_CONNECT)->EnableWindow(); GetDlgItem(IDC_BTN_READ_AXIS0)->EnableWindow(false); GetDlgItem(IDC_BTN_READ_AXIS1)->EnableWindow(false); GetDlgItem(IDC_BTN_DISCONNECT)->EnableWindow(false); } |
Finally, we will add handlers for the Read Axis 0 and Read Axis 1 buttons' BN_CLICK notification. Feel free to use the MFC wizards built in to Visual C++ to add these handlers, or manually enter the following code. Notice that both handlers call a common function (HandleReadAxisButton) to do most of the work.
|
Portion of RMCLinkSampleDlg.h |
class CRMCLinkSampleDlg : public CDialog
{
    ...
    void HandleReadAxisButton(int nAxis);
    DECLARE_MESSAGE_MAP()
    afx_msg void OnBnClickedBtnConnect();
    afx_msg void OnBnClickedBtnDisconnect();
    afx_msg void OnBnClickedBtnReadAxis0();
    afx_msg void OnBnClickedBtnReadAxis1();
};
|
|
Portion of RMCLinkSampleDlg.cpp |
... BEGIN_MESSAGE_MAP(CRMCLinkSampleDlg, CDialog) ... ON_BN_CLICKED(IDC_BTN_CONNECT, OnBnClickedBtnConnect) ON_BN_CLICKED(IDC_BTN_DISCONNECT, OnBnClickedBtnDisconnect) ON_BN_CLICKED(IDC_BTN_READ_AXIS0, OnBnClickedBtnReadAxis0) ON_BN_CLICKED(IDC_BTN_READ_AXIS1, OnBnClickedBtnReadAxis1) END_MESSAGE_MAP() ... void CRMCLinkSampleDlg::OnBnClickedBtnReadAxis0() { HandleReadAxisButton(0); } void CRMCLinkSampleDlg::OnBnClickedBtnReadAxis1() { HandleReadAxisButton(1); } void CRMCLinkSampleDlg::HandleReadAxisButton(int nAxis) { // Display the hourglass while we are trying to connect. CWaitCursor wc; // Read the Target Position (Fx:53) and Actual Position (Fx:8) into local variables. float fTarPos, fActPos; HRESULT hr = m_pRMC->ReadFFile(CRMCLink::fn70StatusAxis0+nAxis, 53, 1, &fTarPos); if ( SUCCEEDED(hr) ) hr = m_pRMC->ReadFFile(CRMCLink::fn70StatusAxis0+nAxis, 8, 1, &fActPos); if ( SUCCEEDED(hr) ) { // Update the display. CString str; str.Format(_T("Axis %d"), nAxis); SetDlgItemText(IDC_GRP_AXIS, str); str.Format(_T("%.3f"), fTarPos); SetDlgItemText(IDC_EDIT_TARPOS, str); str.Format(_T("%.3f"), fActPos); SetDlgItemText(IDC_EDIT_ACTPOS, str); } else { // A read/write error does not disconnect the link. We assume that this // is a link failure and therefore close the connection. OnBnClickedBtnDisconnect(); // Display an error message. CString str; str.Format(_T("Unable to read data. Error code=0x%08X"), hr); MessageBox(str, NULL, MB_ICONEXCLAMATION | MB_OK); } } |
See Also
RMCLink C++ Wrapper Class | How Do I Overview | RMCLink Component
Copyright (c) 2024 Delta Computer Systems, Inc. dba Delta Motion