This topic describes how to create a user program for a simple press application. The concepts illustrated here can be applied to any application.
Keep in mind that when the user program reaches a step, all the commands will be executed immediately. The Link Type tells the user program when to go to the next step. For example, if a step issues a move command, it is possible to go to the next step immediately (the next loop time), it does not have to wait until the axis reaches the position.
Description
Consider a simple press application where the press has one axis of motion. It starts at the top position of 10 in. It moves down toward zero in. at a certain speed. Once it reaches 9 in., it slows down until it reaches 0 in. It dwells at zero for a certain time, then moves back to 10.
The dwell time and both downstroke speeds may vary. They are selected from an HMI that will communicate with the RMC.
Method
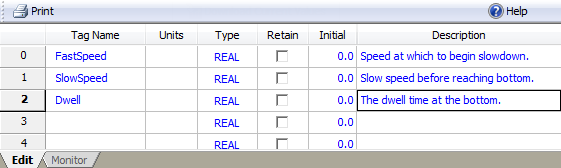
1. Declare Variables
There are three items that can vary. Therefore, declare 3 variables, as shown below. Notice that an HMI or PLC can write to the values of these variables.
2. Create a New User Program
In the Project Pane, expand Programming, right-click User Programs, and click New Program.
In the New User Program dialog, enter a name and click Finish.
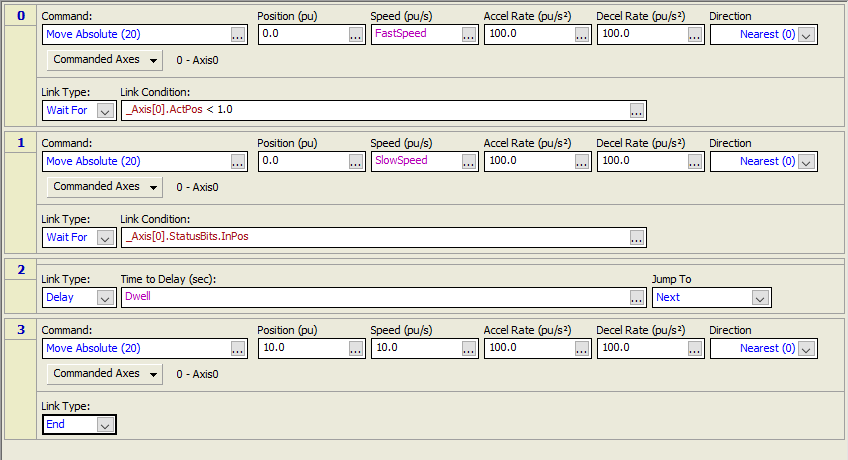
The user program should now have one step and look like this:move

3. Add Command to First Step
The first step issues a command to move to 0 in. Before it reaches 0 in., it will get a different command that slows it down. This is how to add the command to 0 inches:
In the Command box, click the ellipsis button ![]() . Browse to Motion Commands >> Point-to-Point, choose Move Absolute, and click OK.
. Browse to Motion Commands >> Point-to-Point, choose Move Absolute, and click OK.
You can also enter the Move Absolute command into the Command box by starting to type "Move Absolute", then clicking it from the pop-up list.
In the Position box, enter 0.
In the Speed box, click the ellipsis button ![]() . Browse to Variable Table >> Current Values, choose FastSpeed, and click OK.
. Browse to Variable Table >> Current Values, choose FastSpeed, and click OK.
You can also enter the variable by starting to type "FastSpeed", then clicking it from the pop-up list.
In the Accel and Decel boxes, enter 100.
Click the Commanded Axes button, choose Axis0, and click OK.
The user program should now look like this:

4. Choose Link Type in First Step
The Link Type in the first step can be set to tell the user program to go to the next step once the axis reaches 9 inches (the next step will issue a Move command with the SlowSpeed).
In the Link Type box, chooseWait For.
In the Link Condition box, click the ellipsis button ![]() . Choose Soft Limit Switch and click Next.
. Choose Soft Limit Switch and click Next.
Choose One or more specific axes, check Axis0, and click Next.
In the boxes, choose Actual Position, choose < , and type "1", as illustrated:![]()
Click Next, verify that the condition says Is the Actual Position LESS THAN 1.0 for axis "Axis0"?, then click Finish.
The user program should now look like this:

Notice that the Link Type box is red. This indicates an error. In this case, the error is that there is no next step, but one will be created shortly.
5. Add Next Step for Slower Move
The next step will again issue a Move command to 0 inches, this time with a different speed. The step will wait until the axis gets into position before going to the next step.
On the Step Editor toolbar, click the Insert Step button ![]() .
.
Add a Move Absolute command so that step 1 looks like this:
In the step 1 Link Type box, choose Wait For.
In the Link Condition box, click the ellipsis button ![]() . Choose Status Bit(s) and click Next.
. Choose Status Bit(s) and click Next.
Choose One or more specific axes, check Axis0, and click Next.
Check the On box for 0: In Position and click Next.
Verify that the condition says Is the Status bit "In Position" ON for axis "Axis0"?, then click Finish.
Step 1 should now look like this:

6. Add Next Step for Delay
This step will not issue a command. It will only delay a certain time.
Right-click in the left part of step 1, then click Add Step After.
This step will not need a command. Therefore, select the No-Op command and click the Remove Command button  on the toolbar.
In the step 2 Link Type box, choose Delay.
In the Time to Delay box, click the ellipsis button ![]() . Browse to Variable Table >> Current Values, choose Dwell, and click OK.
. Browse to Variable Table >> Current Values, choose Dwell, and click OK.
You can also enter the variable by starting to type "Dwell", then clicking it from the pop-up list.
Step 2 should now look like this:

7. Add Last Step for Move Back
This step will move the axis back up to 10 in.
Right-click in the left part of step 2, then click Add Step After.
Add a Move Absolute command with Position 10, Speed 10, Accel 100, and Decel 100.
Set the Commanded Axes to Axis 0.
Set the Link Type to End.
The user program should now look like this:
8. Download the Programming
To download the programming, in the Project pane, right-click Programming and choose Download Programs to Controller. If any errors are found, the Verify Results Window will list them and provide links to them. All errors must be fixed before the download can occur.
9. Running the User Program
Before running the user program, use the Monitor tab of the Variable
Table Editor to set the Current Values of the variables to reasonable
values. Make sure to click the Download
Current Values button ![]() to apply the edits to
the controller.
to apply the edits to
the controller.
To run the user program, choose the Start Task(90) command in the command tool. In the Task box, choose 0 and in the Program box, choose the user program you created. Click Send. You can use the Task Monitor to see which step the user program is on.
See Also
Copyright © 2026 Delta Computer Systems, Inc. dba Delta Motion