Open topic with navigation
Using Factory Talk View with the RMC
FactoryTalk View can communicate with the
RMC75E, RMC75S, RMC150E, and RMC200. An example FactoryTalk View and RMC75
project is available on the Downloads page Delta's website at https://deltamotion.com/dloads. The example project
can communicate with either an RMC75S or RMC75E. The only difference is
in setting up the communications, as described in this topic.
FactoryTalk View Studio uses RSLinx Enterprise.
RSLinx Enterprise is different from RSLinx Classic. RSLinx Enterprise
is the runtime data collection engine used by FactoryTalk View Studio.
Therefore, you cannot use an EDS file or a Topic as in RSLinx Classic.
To communicate with the RMC from FactoryTalk
View, you will need to add the RMC to RSLinx Enterprise as a MicroLogix
device, then create a Device Shortcut that references it. Notice that
you cannot browse tags in the RMC via RSLinx. Once you have created a
Device Shortcut, you will use it to enter direct addresses in FactoryTalk
View.
The instructions below are for FactoryTalk
View Studio release number 10.00.00.
To add the RMC75E, RMC150E, or RMC200 (Ethernet)
Device Shortcut to RSView:
-
Determine the IP address of the RMC.
-
Disconnect the RMC from your network. This is so RSLinx Enterprise will not see it while you are configuring it.
-
Open an existing project or start a new project.
-
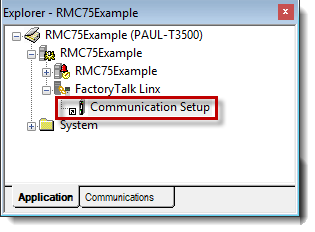
In the Explorer pane, on the Application tab, expand the FactoryTalk Linx node and double-click Communication Setup.
-
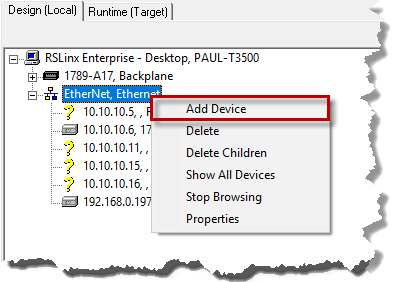
On the Design (Local) tab, expand the Ethernet node. If your RMC is listed, right-click the RMC and choose Delete and click OK.

-
Right-click the Ethernet node and choose Add Device.
-
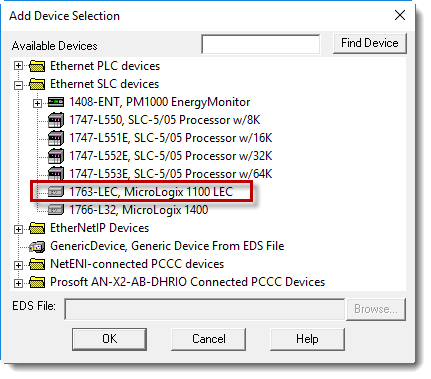
In the Add Device Selection dialog, expand Ethernet SLC Devices, choose the MicroLogix 1100 LEC and click OK.
-
In the Device Properties dialog, enter a name, such as "MYRMC", enter the IP address of your RMC, and click OK.
The RMC should now appear as a 1763 series device in the list.
-
If you are using a Target, repeat the previous three steps on the Runtime (Target) tab to add the same RMC to the list.
-
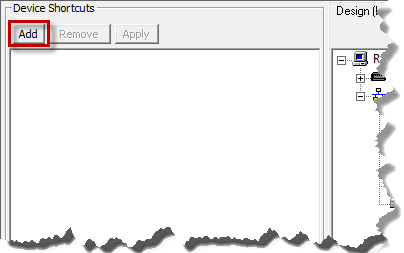
In the Device Shortcuts area of the Communication Setup dialog, click ADD. Enter a name, such as "RMC".
-
Now, you must make sure the shortcut is assigned to the RMC on the Runtime (Local) and Runtime (Target) tabs. In the Device Shortcuts box, make sure the shortcut you added is selected. Then, on the Runtime (Local) tab, select the RMC, and similarly, on the Runtime (Target) tab, select the RMC.
-
In the Device Shortcuts box, click Apply to save the changes to the shortcuts.
-
Click OK to close the Communication Setup.
-
Connect the RMC to the network.
To add the RMC75S (serial) Device Shortcut to RSView:
-
Determine which serial port will be used to connect to the RMC75S.
-
Open an existing project or start a new project.
-
In the Explorer pane, expand the FactoryTalk Linx node and double-click Communication Setup.
-
On the Runtime (Local) tab, right-click RSLinx Enterprise and choose Add Driver. Choose Serial DF1 and click OK.
-
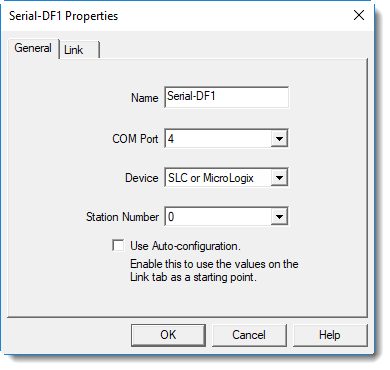
Enter a Name, such as "Serial-DF1 1".
-
In the COM Port box, choose the COM port you will be using.
-
In the Device box, choose SLC or MicroLogix. The Station Number is unimportant. The configured General tab is shown below:
-
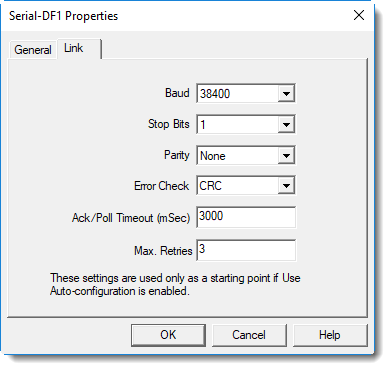
On the Link tab, set the Baud to 38400, and the Error Check to CRC. The Link tab should now be configured as below:
-
Click OK.
-
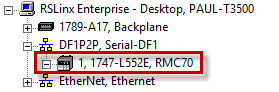
RSLinx Enterprise should start browsing and find the RMC75 on the newly created device:
-
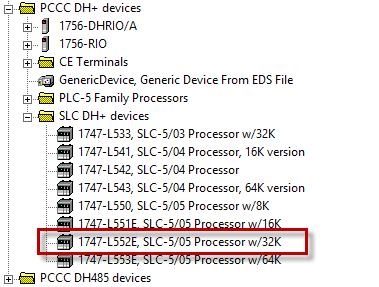
If you are using a Target, repeat these steps on the Runtime (Target) tab. You must manually add the RMC75 on the Runtime (Target) tab. Select the PLC boxed in the below image.
-
In the Device Shortcuts area of the Communication Setup dialog, click ADD. Enter a name, such as "RMC75S".
-
Now, you must make sure the shortcut is assigned to the RMC75S on the Runtime (Local) and Runtime (Target) tabs. In the Device Shortcuts box, make sure the shortcut you added is selected. Then, on the Runtime (Local) tab, select the RMC75S, and similarly, on the Runtime (Target) tab, select the RMC75S.
-
Click OK to close the Communication Setup.
To add a tag using the Device Shortcut (RMC75S, RMC75E,
RMC150E, or RMC200):
-
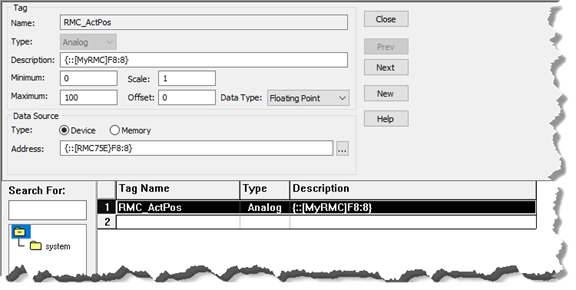
To add a tag, expand the HMI Tags node, and double-click Tags. Select the bottom line in the Tag Name list.
-
In the Name box, enter a name, such as RMC_ActPos.
-
In the Type box, choose Analog. In the Data Type box, choose Floating Point.
-
In the Data Source area, choose Device.
-
The Address must be entered in direct format. The format for REAL values is {::[ShortcutName]Fn:x} , where n is the file number and x is the element number.
For example, with a device shortcut of "RMC75E" and the Axis 0 Actual Position tag (address F8:8), the Address would be:
{::[RMC75E]F8:8}
-
Click Accept. An example of a configured tag is below.
Note:
Using tags with direct addressing in a Numeric Display does not seem to
work properly. When using a Numeric Display, enter the direct address
as the Value. The direct address format is {::[ShortcutName]%MDn.x}
, where n is the file number and x is the element number, as described
above.
See Also
Registers
Maps | Allen-Bradley
Controllers with the RMC
Send comments on this topic.
Copyright © 2026 Delta Computer Systems, Inc. dba Delta Motion