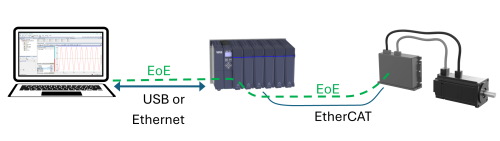
Ethernet over EtherCAT (EoE) is a protocol that allows Ethernet communications to be performed over an EtherCAT network.
EtherCAT and Ethernet use the same physical cables, signals, connectors and electronic circuitry, but are otherwise not compatible. Some EtherCAT devices have a single port, such as RJ-45, for both EtherCAT and Ethernet. During setup, the configuration software for the device uses that port for Ethernet communication. After configuration, the device port is switched to EtherCAT and the configuration software can no longer communicate with the device, because normal EtherCAT and Ethernet communication cannot be performed simultaneously. However, with EoE, the configuration software can communicate to the device over the EtherCAT network, although EoE performance is usually much slower than typical Ethernet.
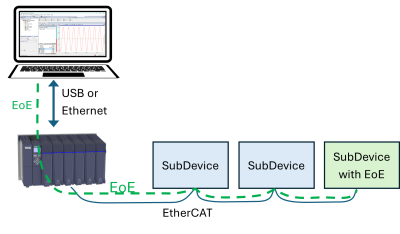
The RMC200 EtherCAT supports Ethernet over EtherCAT. The EoE connection extends from RMCTools on the PC, through the RMC and to an EtherCAT SubDevice that supports EoE. EoE is supported even through a USB connection from the PC to the RMC.
EoE requires a software Ethernet TAP adapter on the PC that is running RMCTools. Once a TAP adapter is set up and EoE has been configured in RMCTools and in the RMC, you can run other software on the PC that requires Ethernet communication to a device on the EtherCAT network.
Two types of EoE setups are:
Without additional hardware:
This is useful for communicating via EtherNet to a device on the EtherCAT network.
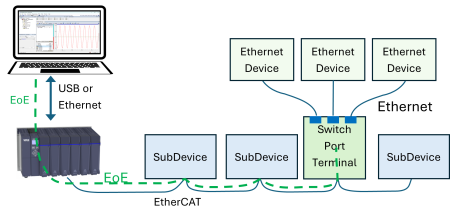
With an EoE Switch Port Terminal:
An EoE Switch Port on the EtherCAT network provides an Ethernet port to which multiple Ethernet devices can be connected.
TAP Adapter
Setting up EoE requires a TAP adapter on your PC. A TAP adapter is a virtual network device. It works similarly to built-in network adapters that include a physical RJ45 port, but is powered entirely by software, with no associated physical port.
To set up a TAP adapter:
These instructions apply to a Windows 10 or Windows 11 operating system.
Install OpenVPN on your computer, if not already installed.
After installing, navigate to the OpenVPN install location (such as C:\Program Files\OpenVPN Connect\), browse to the subfolder drivers → TAP → x86 → Win10, then run tapinstall.exe. This will allow OpenVPN to create the access point for the EoE tunnel.
On the Windows Start menu on your computer, open the Settings menu, and select Network & Internet.
Select Advanced network settings. A new TAP-Windows adapter should now be visible.
Select Rename, and name the new network adapter to something descriptive, for example, “EoE Adapter” so that it will not be confused with other network adapters.
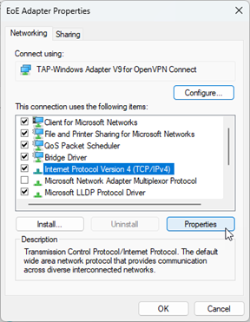
Select Edit. On the Networking tab, scroll down and double-click Internet Protocol Version 4 (TCP/IPv4).
Set a static IP for the TAP adapter. For example:
| IP Address | 192.168.150.1 |
| Subnet mask | 255.255.255.0 |
This is similar to setting an IP address for the RJ45 port on your PC, except that it is for a virtual adapter. You will need to make sure it does not interfere with other IP address settings on the PC.
Now you have completed setting up the TAP adapter and your PC is ready for setting up EoE.
Setting Up EoE to a SubDevice
These are instructions for setting up EoE to a SubDevice on the EtherCAT network, to which Ethernet communications are required:
Physically connect the SubDevice to the EtherCAT network.
Use the ESI Manager to install the ESI file for the SubDevice.
In the EtherCAT Editor, add the SubDevice to the network.
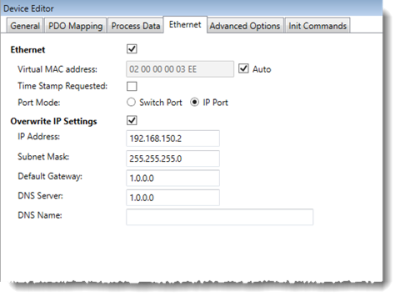
In the EtherCAT Editor, select the SubDevice, then select the Ethernet tab.
Make sure the Port Mode is set to IP Port.
Check the Overwrite IP Settings checkbox, then set the IP Address and Subnet Mask for the SubDevice such that the IP address you set for the TAP Adapter is compatible with the IP address of the SubDevice.
For example:
IP Address: 192.168.150.2
Subnet mask: 255.255.255.0
Default Gateway: 1.0.0.0
DNS Server: 1.0.0.0
Download the EtherCAT configuration to the RMC.
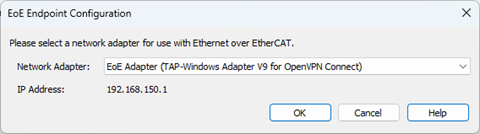
In the Project View, right-click the EtherCAT node and select Start EoE tunnel. The EoE Endpoint Configuration dialog should open.
Choose the EoE Adapter you created earlier, confirm the IP Address of the adapter, then click OK.
The EoE tunnel is now active. Other software on your PC should now be able to communicate with the SubDevice using the IP address you assigned to the SubDevice.
Each time the EtherCAT network restarts, or the RMCTools connection is broken, the EoE tunnel must be restarted (by right-clicking the EtherCAT node and selecting Start EoE tunnel).
Setting up a Switch Port Terminal
These are instructions for setting up EoE to a Beckhoff EL6601 Switch Port Terminal on the EtherCAT network. The general steps are the same for other devices but have not been tested by Delta Motion. These instructions apply to Windows 10 or Windows 11.
Physically connect the Beckhoff EL6601 to the EtherCAT network.
Use the ESI Manager to install the ESI files for the SubDevice.
In the EtherCAT Editor, add the Beckhoff EL6601 as a SubDevice to the network.
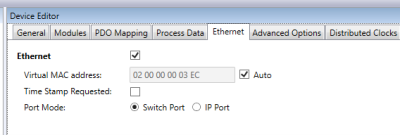
In the EtherCAT Editor, select the Beckhoff EL6601, then select the Ethernet tab.
Check the Switch Port checkbox.
Download the EtherCAT configuration to the RMC.
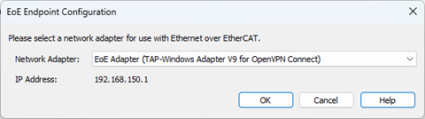
In the Project View, right-click the EtherCAT node and select Start EoE tunnel. The EoE Endpoint Configuration dialog should open.
Choose the EoE Adapter you created earlier, confirm the IP Address of the adapter, then click OK.
The EoE tunnel is now active. Ensure the IP address you set for the Ethernet device is compatible with the IP address of the TAP Adapter. Other software on your PC should now be able to communicate with Ethernet devices connected to the Beckhoff EL6601 Switch Terminal.
Each time the EtherCAT network restarts, or the RMCTools connection is broken, the EoE tunnel must be restarted (by right-clicking the EtherCAT node and selecting Start EoE tunnel).
See Also
EtherCAT Network | EtherCAT Overview | ESI Manager
Copyright © 2026 Delta Computer Systems, Inc. dba Delta Motion