Overview
The CS1 and CV families of PLCs from Omron Electronics Inc. can be used to control the RMC over Ethernet. These PLCs require the ETN01 Ethernet Unit and use Omron's FINS protocol to communicate with the RMC.
Note: Ethernet communication with the Omron PLCs requires RMC ENET firmware dated 20001023 or later.
Note: The documentation below assumes the user is familiar with Omron PLC programming, and instead focuses on how to initiate reads and writes to an RMC.
The FINS protocol uses a three-stage addressing system: network address, node number, and unit number. These three address elements have the following purposes:
Network Address:
This value identifies the network on which the target node resides. The PLC looks up this number in its Local and Remote Network Tables to determine which local unit number should be used to send out the request. For Ethernet systems, typically only the Local Network Table is used to map a network address (for example, 1) to the unit number on the ETN01 Ethernet Unit (for example, 0). See your Omron PLC and/or CX-Programmer documentation for details on setting up the Local and Remote Network Tables.
Node Number:
This value identifies the node on the network given by the network address. For Ethernet networks, this number must be converted to an IP address. This conversion is done by the ETN01 Ethernet Unit. Three methods are available. In the Automatic Address Generation method, the IP address is derived by combining the ETN01's IP Network Address (e.g. 192.168.0.0) with the Node Number (e.g. 5) to get an IP Address (e.g. 192.168.0.5). In the IP Address Table method, each Node Number maps to an IP Address via an entry in an IP Address Table. In the Combined method, the IP Address Table is used first, but if the Node Number is not found in the table, then the Automatic Address Generation method is used. See the Omron ETN01 Ethernet Unit manual for details on these methods.
Unit Number:
This value identifies the unit number on the rack of the remote node identified by the Network Address and Node Number.
The RMC does not require manually setting these values in the RMC. Only the IP address needs to be set in the RMC; see RMC Ethernet IP Address Setup for details. See the discussion below on setting up the RECV and SEND instructions for details on what values to use for the Network, Node, and Unit numbers when communicating with an RMC.
The RMC has 64K registers. When accessed by Omron PLCs, this data appears in Data Memory (DM) registers D0 to D16383, and Extended Data Memory (EM) registers En_0 to En_6143, where n is the bank number from 0 through 7. For CPUs that do not support some or all of these Extended Data Memory Banks, the only functionality that will be lost is reading up complete plot data. The CV500 PLC also cannot read data beyond D8191, however, the only feature that is lost by this limitation is access to the Spline Download Area. See RMC Register Map (Omron FINS) for details.
The Omron CS1 and CV PLCs use the Network Receive (RECV) and Network Send (SEND), instructions to read and write registers in remote devices such as the RMC over FINS. The Omron PLC instruction manuals are very well written and should suffice as a reference for setting up this communication. However, a brief synopsis of each of these instructions is provided below, followed by an example.
Network Receive: RECV(098) for CS1, RECV(193) for CV
This instruction is used to read data from the RMC's registers into the PLC's registers. It has the following format:

RECV should be energized for only one scan to start the communication. After that, the Communications Port Enabled Flag (A202.00 to A202.07 on the CS1 family and A502.00 to A502.07 on the CV family) should be used to determine when the operation is complete, as described in the Omron documentation. Each parameter is described below:
S First Source Word in Remote Node. Give the starting address to read from in the RMC. This must be either a DM (Dnnnnn) or EM (Eb_nnnnn) address. The current extended data memory bank on the RMC is always set to bank 0. Refer to the RMC Register Map (Omron FINS) topic for exact addresses.
D First Destination Word in Local Node. Give the starting address in the PLC to store the data read from the RMC. This is typically a DM address.
C First Control Word. This instruction uses a block of five control words. These words are used to control the network communication itself. These five words are defined as follows:
|
Word |
MSB (Bits 8-15) |
LSB (Bits 0-7) |
|
C |
Number of words to read (1 to 512). |
|
|
C+1 |
Always 00 for RMCs. |
Remote Network Address. |
|
C+2 |
Remote Node Number. |
Remote Unit Number. |
|
C+3 |
Port Number: 00 to 07. |
No. of Retries: 00 to 0F (0 to 15). |
|
C+4 |
Timeout: 0001 to FFFF (0.1 to 6553.5 seconds). |
|
Network Send: SEND(090) for CS1, SEND(192) for CV
This instruction is used to write data from the PLC's registers to the RMC's registers. It has the following format:

SEND should be energized for only one scan to start the communication. After that, the Communications Port Enabled Flag (A202.00 to A202.07 on the CS1 family and A502.00 to A502.07 on the CV family) should be used to determine when the operation is complete, as described in the Omron documentation. Each parameter is described below:
S First Source Word in Local Node. Give the starting address in the PLC of the data to write to the RMC. This is typically a DM address.
D First Destination Word in Remote Node. Give the starting address in the RMC of the place to write the data. This must be a DM address (Dnnnnn). None of the RMC's EM banks can be written to. Refer to the RMC Register Map (Omron FINS) topic for exact addresses.
C First Control Word. This instruction uses a block of five control words. These words are used to control the network communication itself. These five words are defined as follows:
|
Word |
MSB (Bits 8-15) |
LSB (Bits 0-7) |
|
C |
Number of words to write (1 to 512). |
|
|
C+1 |
Always 00 for RMCs. |
Remote Network Address. |
|
C+2 |
Remote Node Number. |
Remote Unit Number. |
|
C+3 |
Port Number: 00 to 07. |
No. of Retries: 00 to 0F (0 to 15). |
|
C+4 |
Timeout: 0001 to FFFF (0.1 to 6553.5 seconds). |
|
CS1 Example
The user has an Omron CS1 PLC with a CS1W-ETN01 Ethernet Unit and an RMC-ENET. The Omron PLC has just one network, which is the Ethernet network accessible through an ETN01 Ethernet Unit. This network has Network Address 1. The ETN01 Ethernet Unit has Unit Number 0. The Omron PLC has IP address 192.168.0.2, and the RMC has IP address 192.168.0.5. The Omron ETN01 is set up to use Automatic Address Generation, so the RMC has Node Number 5, and the ETN01 has node number 2.
The following diagram demonstrates the configuration:

The Omron PLC must have one entry in its Local Network Table. This entry assigns Network Address 1 (the Ethernet network) to Unit Number 0 (the ETN01 Ethernet Unit).
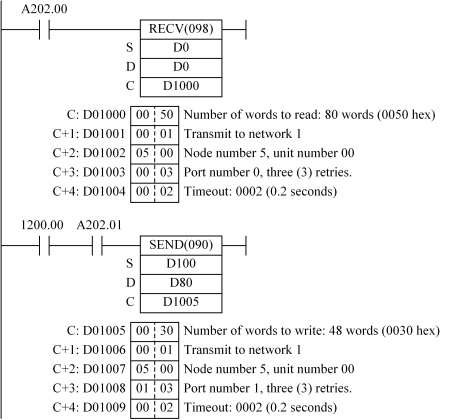
The user wishes to continuously read the 80 status words starting at address D0 in the RMC and store them at D0 in the PLC. The user also wishes to write 48 words from D100-D147 to the RMC's command registers D80-D127 whenever the 1200.00 coil is set. The following ladder logic does this:

In this example, the RECV(098) instruction will be triggered each time the Communication Port 0 Enabled Flag (A202.00) is set. This flag will be set any time port 0 is not busy. Therefore, the PLC will read these registers from the RMC continuously as fast as it can. Depending on the load of the PLC, this will read the RMC's status as often as every 18 ms.
The SEND(090) instruction uses port 1. It is important that this is a different port number from the RECV(098) instruction. It is possible to use the same port number for two network instructions, but this reduces performance and requires additional synchronization ladder logic. Examples of doing so are given in the Omron documentation.
CV Example
The user has an Omron CV PLC with a CV500-ETN01 Ethernet Unit and an RMC-ENET. The Omron PLC has just one network, which is the Ethernet network accessible through an ETN01 Ethernet Unit. This network has Network Address 1. The ETN01 Ethernet Unit has Module Address (equivalent to Unit Number in the CS1) 0. The Omron PLC has IP address 192.168.0.2, and the RMC has IP address 192.168.0.5. The Omron ETN01 is set up to use Automatic Address Generation, so the RMC has Node Number 5, and the ETN01 has node number 2.
The following diagram demonstrates the configuration:

The Omron PLC must have one entry in its Local Network Table. This entry assigns Network Address 1 (the Ethernet network) to Module Address 0 (the ETN01 Ethernet Unit).
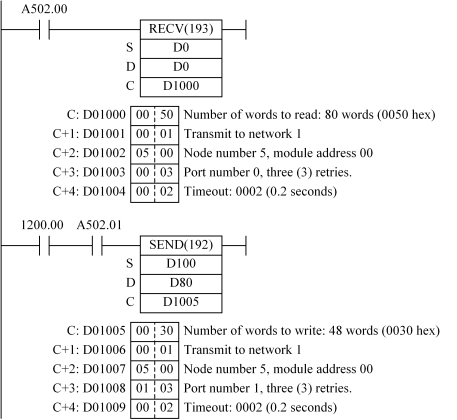
The user wishes to continuously read the 80 status words starting at address D0 in the RMC and store them at D0 in the PLC. The user also wishes to write 48 words from D100-D147 to the RMC's command registers D80-D127 whenever the 1200.00 coil is set. The following ladder logic does this:

In this example, the RECV(193) instruction will be triggered each time the Communication Port 0 Enabled Flag (A502.00) is set. This flag will be set any time port 0 is not busy. Therefore, the PLC will read these registers from the RMC continuously as fast as it can. Depending on the load of the PLC, this will read the RMC's status as often as every 18 ms.
The SEND(192) instruction uses port 1. It is important that this is a different port number from the RECV(193) instruction. It is possible to use the same port number for two network instructions, but this reduces performance and requires additional synchronization ladder logic. Examples of doing so are given in the Omron documentation.
Copyright (c) 1997-2015 by Delta Computer Systems, Inc.