For a description of all Scale/Offset Calibration Utilities, see Using the Scale/Offset Calibration Utilities. This utility is available only on differential force axes. To use the Differential Force Scale/Offset Calibration Utility:
Obtain the following information:
Pressure Gauge Scale: This is the pressure at which the RMC will receive its maximum voltage or current. For example, if the RMC input is configured for a 0 to 5 V transducer, then you should enter the pressure at which the gauge will return a 5 V signal, even if it can return more than 5 V. For 4-20 mA gauges, give the pressure at 20 mA.
Note: The pressure gauges on each end of the hydraulic cylinder or motor should have the same range.
Actuator Type: Three configurations are handled by this utility:
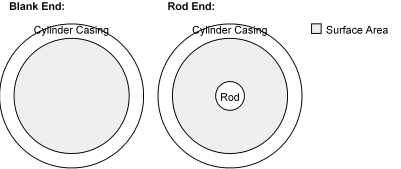
Hydraulic Cylinder with a Single-Ended Rod
In this configuration, the surface area on each side of the piston is multiplied by the pressure reading to give a resultant force. It is necessary to convert to force units when using a single-ended rod because equal pressures do not exert an equal force because the surface areas differ on each side of the piston, as shown below:

Note: Because the surfaces areas are different for each side of the piston in a hydraulic cylinder with a single-ended rod, SCALE A and SCALE B are not interchangeable. As a result, the first channel in the differential pair (channel 0 or 2) must be connected to the pressure sensor on the blank or cap end of the cylinder, and the second channel (channel 1 or 3) must be connected to the pressure sensor on the rod end of the cylinder. If you have wired the sensors in the opposite direction, and prefer not to change your wiring, then you will need to manually swap SCALE A and OFFSET A with SCALE B and OFFSET B.
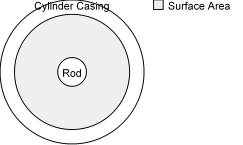
Hydraulic Cylinder with a Double-Ended Rod
In this configuration, the surface area on each side of the piston is multiplied by the pressure reading to give a resultant force. The following diagram shows how the surface area is calculated:

Because the surface areas on either side of the piston are equal, the scales and offsets will be equal for each pair.
Hydraulic Motor
In this configuration, the conversion from pressure to force can take many forms, since the pressure is converted to torque, which exerts a force on the system. Therefore, instead of a differential force being computed, a differential pressure is computed.
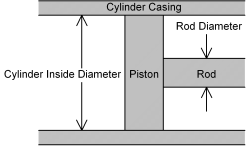
Cylinder Dimensions: If your actuator is a hydraulic cylinder, then you will need to enter the cylinder's inside diameter and the rod's diameter. These values are necessary to convert the pressures read by each pressure gauge to forces by multiplying by the surface areas on each side of the piston.

Desired Force/Pressure Direction: The difference force is computed by A - B, where A is the force computed from the first channel in the differential pair (channel 0 or 2), and the B is the force computed from the second channel in the differential pair (channel 1 or 3). As a result, the differential force will increase when Force A increases with respect to Force B. This is typically how applications are set up. In this case you should select the first Force Direction option in the calibration tool.
However, in some applications, the differential force should increase when Force B increases with respect to Force A. In this case, you should select the second option. This will negate both forces (since -A - -B = B - A), so you will see Force A and Force B displayed as negative values, but the differential force should be correct.
Desired Force/Pressure Units: This calibration tool is set up to easily allow you to have your force displayed in any of seven precisions (1000, 100, 10, 1, 0.1, 0.01, 0.001) of several common force units: pounds, Newtons, kilograms, metric tons (1000 kg), short (US) tons (2000 lb), long (UK) tons (2240 lb). In addition, you can manually enter a value in terms of any of the above units by selecting a base unit, and entering a conversion factor instead of selecting one of the powers of ten. See step 5 below for further details on using this section of the calibration tool.
Place the cursor in a field under the differential force axis you wish to calibrate.
On the Tools menu, click Scale/Offset Calibration.
Enter the above pieces of information.
Review the values displayed in the Resultant Force/Pressure area. This area shows the maximum forces, or pressures for hydraulic motors, that can be read from either channel. The values in Force Units are what will be used by the RMC and displayed in RMCWin. Notice that they cannot exceed 32,500 units. Displayed below each value in RMC Force Units is the equivalent value in the engineering units selected in the Desired Force/Pressure Units area.
If the maximum forces in RMC Force Units are both below 3,250, then you may want to decrease the multiplier under Desired Force/Pressure Units to get finer resolution. For example, if the maximum force is listed as 900 force units and you have one force unit set to equal one (1) metric ton, then you can change one force unit to equal one tenth (0.1) of a metric ton. This will give a maximum force in RMC force units of 9,000. Notice that the maximum force in engineering until will still equal 900 metric tons.
It is also possible to get a message to this effect:
"The requested scale is too large. Increase the size of each force unit."
If this happens, then you are requesting that each force unit be less than one pressure transducer count. The solution is to change the size of each RMC force unit. For example, if you had one force unit set equal to one (1) pound (lb), and you get this message, then change one force unit to be equal to ten (10) pounds. If the message remains, continue to increase the size to 100 or 1000 pounds, or even switch from pounds to tons (short, US).
Click Apply, which sets the Scale A, Offset A, Scale B, Offset B, and the Prescale Divisor bits of the Configuration word.
Click Done.
Issue a 'P' command for the axis to have the new parameters take affect.
Copyright (c) 1997-2015 by Delta Computer Systems, Inc.