Tuning a Pressure/Force System
The following procedure may be used to tune a pressure-only or force-only axis. For details on setting up a pressure-only or force-only axis, see Controlling Only Pressure or Force.
If you are tuning a position-pressure or position-force axis, see the Tuning a Position-Pressure or Position-Force System topic.
Please read the Tuning Overview topic before performing the tuning procedure.
There is no substitute for experience when tuning an axis. This procedure offers some guidelines, tips, and suggestions for tuning your system. While these steps will work for some systems, they may not be the best for a particular system.
Position/Pressure Tuning Procedure
Pre-Tuning Steps:
These steps come before actually tuning the gains.
1.  Set the Pressure/Force Limits
Set the Positive Pressure/Force Limit and Negative Pressure/Force Limit. These specify the pressure/force range in which the axis will be allowed to control. If the Target Pressure/Force exceeds these values, an error bit will be set and will halt the axis if the AutoStops are set to do so.
2. Set the AutoStops
Set the Pressure/Force Following Error AutoStop to Status Only to prevent following errors from halting the axis during the tuning. After the tuning is complete, set the AutoStops to values that are safe for machine operation.
3. Set Up the Tuning Tools
In the Tuning Tools, on the Pressure or Force tab, set up the command buttons so that one button will ramp the pressure or force in one direction, and the other button will ramp it in the other direction.
-
Click the down arrow on the command button  .
.
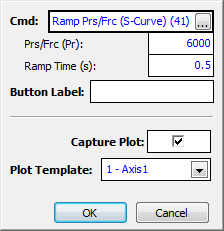
-
Enter the Pressure/Force, and Ramp Time, then click OK.
Example:
-
Repeat the previous step for the other command button, and enter a different value for the Pressure/Force.
Tuning Steps:
1. Enter Pressure/Force Control
Set the Pressure/Force Proportional Gain to a small value, such as 0.01.
In the Tuning Tools, on the Pressure/Force tab, click the Hold Prs/Frc button to enter pressure/force control. Then click one of the buttons you set up to ramp the Command Pressure to the desired value.
You may wish to move the axis in open loop to where it encounters pressure/force before you click the Hold Prs/Frc button.
If the axis halts due to an Output Saturated error, reduce the Proportional Gain and repeat.
2. Adjust the Proportional Gain
Start with a small value. If the application is a hydraulic cylinder controlling force in pounds, a typical starting value may be 0.01 or smaller.
In the Tuning Tools, on the Pressure/Force tab, notice that the Target Pressure/Force and Actual Pressure/Force are displayed.
Keep increasing the Proportional Gain until the Actual Pressure/Force starts moving toward the Target Pressure/Force. It should not get all the way toward to Target Pressure/Force. Give just enough gain to make sure the Actual begins approaching the Target.
3. Adjust the Integral Gain
Add some Pressure/Force Integral gain, approximately twice as much as the Pressure/Force Proportional Gain. The Actual Pressure/Force should go towards the Target Pressure/Force.
Do not give a lot of Integral Gain, just enough to make sure it eventually gets to the Target Pressure/Force.
4. Ramp the Pressure/Force Up and Down
For the remainder of the tuning (steps 5, 6 and 7), repeat the following steps for each gain parameter you change:
-
Ramp the pressure/force with one of the buttons you set up in the Tuning Tools.
-
View the plot.
-
Change the gain.
Tip: You can use the Tuning Wizard to calculate a model and use the Gain Calculator to choose gains. After uploading a plot of pressure or force control, where the axis is controlling a changing pressure or force, click the Tuning Wizard.
If you use the Tuning Wizard, you do not need to continue manually changing the gains.
5. Adjust the Feed Forwards
Pressure/Force Rate Feed Forward
Ramp the pressure/force, and adjust the Pressure/Force Rate Feed Forward. Start with a small value. The Pressure/Force Rate Feed Forward should help the Actual Pressure/Force track the Target Pressure/Force during the ramp. Your system may not need any Pressure/Force Rate Feed Forward.
Pressure/Force Feed Forward
Most systems do not require the Pressure/Force Feed Forward. If your system exerts a pressure or force that is roughly linear to the amount of Control Output, you may need the Pressure/Force Feed Forward. To tune the Pressure/Force Feed Forward, move the Target Pressure/Force to various values, and adjust the Pressure/Force Feed Forward while the Target Pressure/Force is stationary. Do this for several value of pressure/force to ensure the best Pressure/Force Feed Forward.
6. Re-adjust the Proportional and Integral
Ramp the pressure/force, and re-adjust the proportional and integral gains. This should make it track better.
7. Adjust the Differential Gain
If you need better control, add some Differential Gain. The Differential Gain is typically a couple orders of magnitude less than the Proportional Gain.
8. Fine-tune the System
The final tuning of the system should be made at the rate and pressure/force range of intended operation. Look for following errors, overshoot, or oscillations, and consider the following:
-
Should the system seem a little sloppy, try adjusting the Proportional Gain.
-
If the actual pressure lags or leads the target position during the entire constant velocity section of the move, adjust the Feed Forwards.
-
If an Output Saturated error occurs, there is not enough drive capacity to drive the axis at the requested rate of pressure/force change. Should this occur, increase the Ramp Time or decrease the speed of the system.
-
If the Control Output is not high, the gains can probably be increased for better control, depending on system stability.
-
Adding or changing the pressure/force feedback filter may help if noisy feedback is suspected.
See Also
Tuning Overview
Send comments on this topic.
Copyright © 2025 Delta Computer Systems, Inc. dba Delta Motion