Open topic with navigation
Using Wonderware with the RMC
The RMC family of controllers can communicate
with Wonderware InTouch via Ethernet.
Example Programs
Delta provides example PLC programs to help
you quickly set up the communications between your PLC and the RMC. See
the downloads
section of Delta's website at https://deltamotion.com.
Communicating with the RMC
RMC75E, RMC150E, or RMC200
Either the DASABCIP server (CIP) or DASMBTCP
server (Modbus/TCP) can be used to communicate with the RMC75 via Ethernet.
This topic describes both methods. The DASABTCP server can also used,
but it does not easily read individual bits in a DWORD.
RMC75S
The DASMBSerial server (Modbus/RTU) can be used.
This topic does not describe this method, although it is similar to using
the DASMBTCP server.
Using the DASABCIP Server
The DASABCIP Server uses EtherNet/IP communications.
Setting up the DASABCIP Server
Note: These instructions
are for DASServer manager version 0750.0065.
-
Install the DASABCIP server.
-
In the ArchestrA System Management Console, under the ArchestrA.DASABCIP folder, add a new port.
-
Right-click the new port and choose Add an ML_EN Object. Set up the ML_EN Object as follows:
-
In the Host Name box, enter the IP address of the RMC.
-
An example configuration is shown below.
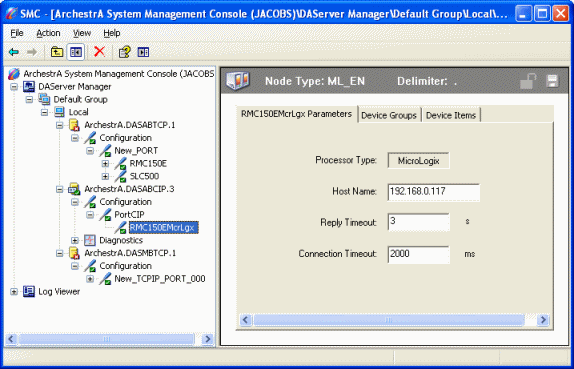 asdf
asdf
-
On the Device Groups tab, add a device called RMC.
-
Make sure to activate the DASABCIP server.
Adding an RMC Analog Display to an InTouch Window
Follow these steps to add the Axis 0 Actual
Position to an InTouch window.
Note: These instructions
are for InTouch 9.5.
-
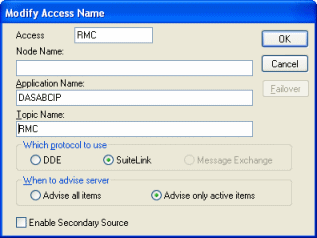
On the Special menu, click Access Names, then click Add, and do the following:
-
In the Access box, type an name like "RMC" (without the parentheses).
-
In the Application Name box, type "DASABCIP" (without the parentheses).
-
In the Topic Name box, type the name you entered in the Device Group tab in the System Management Console. This is "RMC" (without the parentheses).
-
Click OK.
-
On the Special menu, click Tagname Dictionary, then click New, and do the following:
-
In the Tagname box, type an name like "Axis0ActPos" (without the parentheses).
-
Click Type and choose I/O REAL, and click OK.
-
Choose Read Only.
-
Click Access name, choose RMC and click Close.
-
In the Item box, type "F8:8" (without the parentheses). This means it is looking at a register F8:8 in the RMC, which is the Axis 0 Actual Position.
-
Click Save, then click Close.
 aa
aa
-
In an InTouch window, go to the Wizard Selection dialog, choose Value Displays, choose Analog Tagname Display, and click OK.
-
Place the display on the window, double-click the display, and do the following:
-
In the Tagname box, type "Axis0ActPos" (without the parentheses).
-
In the Number Format box, choose ###,###.
-
Click OK.
-
Click Runtime!
-
The runtime window will display the actual position of the RMC.
Item Address Details using DASABCIP
RMC data registers can be addressed as F or
L registers. If the RMC register is a floating-point number, use F. If
it is a DINT or DWORD use L.
To address a bit in an L word, use /b,
where bit is the bit number, beginning with 1. For example, L8:0/1 looks
at the first bit in the Axis 0 Status bits.
Using the DASMBTCP Server
The DASMBTCP Server uses Modbus/TCP communications.
Setting up the DASMBTCP Server
Note: These instructions
are for DASServer manager version 0750.0065.
-
Install the DASMBTCP server.
-
In the ArchestrA System Management Console, under the ArchestrA.DASMBTCP folder, add a new port. The port should be set to 502.
-
Right-click the new port and choose Add a Modbus PLC Object. Set up the ModbusPLC Object as follows:
-
In the Network address box, enter the IP address of the RMC.
-
In the Bit order format box, choose B16 B16 … B1.
-
In the Register size box, choose 6.
-
Select Binary Register Type.
-
An example configuration is shown below. Notice the IP Address is normally something like 192.168.0.34, but this example uses the URL for the online RMC75E.
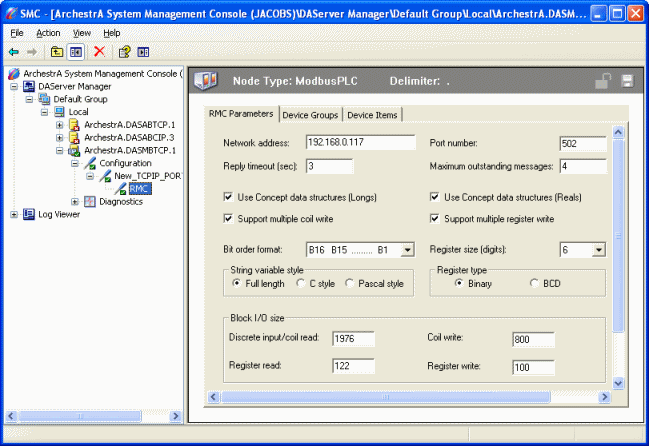 asdf
asdf
-
On the Device Groups tab, add a device called RMC.
-
Make sure to activate the DASMBTCP server.
Adding an RMC Analog Display to an InTouch Window
Follow these steps to add the Axis 0 Actual
Position to an InTouch window.
Note: These instructions
are for InTouch 9.5.
-
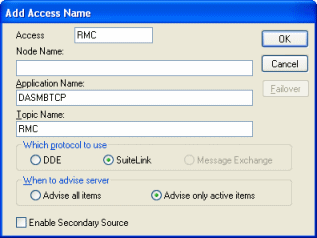
On the Special menu, click Access Names, then click Add, and do the following:
-
In the Access box, type an name like "RMC" (without the parentheses).
-
In the Application Name box, type "DASMBTCP" (without the parentheses).
-
In the Topic Name box, type the name you entered in the Device Group tab in the System Management Console. This is "RMC" (without the parentheses).
-
Click OK.
-
On the Special menu, click Tagname Dictionary, then click New, and do the following:
-
In the Tagname box, type an name like "Axis0ActPos" (without the parentheses).
-
Click Type and choose I/O REAL, and click OK.
-
Choose Read Only.
-
Click Access name, choose RMC and click Close.
-
In the Item box, type "404113 F" (without the parentheses). This means it is looking at a "4" type register at address 4113 (the Modbus address for Axis 0 Actual Position) and it is a Floating-point value.
-
Click Save, then click Close.
 aa
aa
-
In an InTouch window, go to the Wizard Selection dialog, choose Value Displays, choose Analog Tagname Display, and click OK.
-
Place the display on the window, double-click the display, and do the following:
-
In the Tagname box, type "Axis0ActPos" (without the parentheses).
-
In the Number Format box, choose 0.000.
-
Click OK.
-
Click Runtime!
-
The runtime window will display the actual position of the RMC.
Item Address Details using DASMBTCP
All RMC data registers are of Modbus memory
type "4".
In the Item
box in the Tagname dictionary, adding " F" to the end of the
Modbus address indicates it is a floating-point number. Adding "
L" to the end of the Modbus address indicates it is a 32-bit integer.
Adding ":" and then the number, such as "404097:1"
treats it as a discrete, with number after the colon indicating the bit
number. Wonderware counts bits starting at 1.
Calculating RMC Register Addresses
Use the Register
Maps to find the Modbus/TCP addresses of the desired registers in
the RMC75E. You can also use the Modbus
Addressing topic to easily convert the two-level addressing to Modbus
addresses.
See Also
Communications Overview
| Register Maps
Send comments on this topic.
Copyright © 2026 Delta Computer Systems, Inc. dba Delta Motion